Peanut Brittle

In the family recipes, this was labeled as “Buttery Peanut Brittle”–and it definitely is buttery. That might be what makes it better than most. I love it at Christmas and probably end up eating more than we deliver to neighbors and friends. Haha. This was also a great treat for me when I had to do the FODMAP diet.

The original recipe calls for 2 c. peanuts, but I want it insanely loaded with peanuts, so I upped it to 3 c. Also, sometimes raw peanuts are really hard to find. We have made this with unsalted roasted peanuts when we couldn’t find raw peanuts. It’s still delicious but obviously has a slightly different taste and texture.

And thankfully this one is naturally gluten free. Just check your nuts that they don’t say they may contain wheat.

Peanut Brittle

  • Servings: 8?
  • Difficulty: medium
  • Print


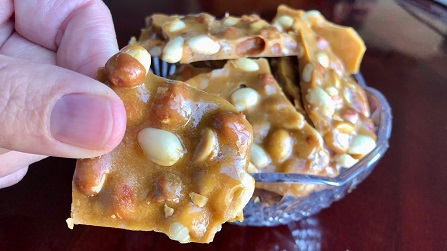
Crunchy, buttery, and bursting with peanuts.

Ingredients

  • 2 c. Sugar
  • 1 c. Light Corn Syrup
  • 1/2 c. Water
  • 1 c. Butter
  • 2 – 3 c. Raw Peanuts (a 16 oz. bag is about 3 c.) (check for gluten free)
  • 1 tsp. Baking Soda

Directions

Line two cookie sheets with foil and butter them, then place the pans on hot pads. In a heavy saucepan, combine sugar, corn syrup, and water. Cook and stir until sugar dissolves. When syrup boils, blend in butter. Stir frequently after the mixture reaches 230°. Add peanuts when the temperature reaches soft crack stage (around 280°) and stir constantly until the temperature reaches hard crack stage (around 305°). (You may want to use the ice water method to check for desired texture.) Remove from heat and quickly stir in soda. Mix thoroughly. Pour onto prepared cookie sheets. As candy cools, stretch it out thin by lifting and pulling from edge, using forks. Loosen from pans as soon as possible and break into pieces.


English Toffee

Another candy in our Christmas triumvirate: English toffee. Haha, with the other two being caramels and peanut brittle. I’m sure most recipes call for a specific temperature, but my mom would always say to cook it until it almost smells like it’s starting to burn. But lately I’ve been doing the ice water test to make sure it’s crunchy enough. Every once in a while this toffee can get a little grainy or not as hard as I want, but it’s so delicious that we don’t really care and still eat the slightly off batches.

You can kind of use any milk chocolate that you’d like–I remember my mom taking the plain Hershey bars from the miniatures collection or the Nuggets collection that no one wanted and melting them on top of the toffee. What a great use of the boring chocolate that everyone left behind. Haha. We’ve also made this toffee with pecans and sliced almonds instead of walnuts–both were great. So pick your favorite nut and try it out.

And thank goodness this one is naturally gluten free. Just make sure your nuts don’t say that they may contain wheat.

English Toffee

  • Servings: 1 pan
  • Difficulty: medium
  • Print


Crunchy, chocolatey, and perfect for Christmas.

Ingredients

  • 1 c. Butter
  • 1 c. Sugar
  • 2 Tbsp. Water
  • 2 c. Milk Chocolate Chips
  • ½ c. Chopped Walnuts (or desired nuts) (check for gluten free)

Directions

Pour a scant layer of chopped nuts on a foil-lined baking sheet. Mix butter, sugar, and water in heavy pan. Melt and bring to boil, stirring constantly. Cook about 5 minutes or until syrup turns a darker color and begins to smell like it’s burning, generally between soft and hard crack or around 270 or so. (You may want to try the ice water test to make sure it’s your desired texture.) Pour immediately onto foil-lined pan. Sprinkle top of hot candy with chocolate chips. Let melt and spread with knife to cover. Sprinkle with chopped nuts. Let cool completely so chocolate is solidified. Lift candy slab from foil and break into pieces.


Caramels

These caramels are a Christmas tradition every year in my house, and we often give them to neighbors as a gift. In my mom’s recipe box, this was labeled “Never Fail Caramels” because unlike regular finicky caramels, these ones aren’t difficult to make. Plus, the recipe is VERY simple–just the same amount of every ingredient.

I wouldn’t say these caramels NEVER have any issues, because you do have to stir pretty well or you’ll end up with brown specks in your caramel. That’s pretty common for any dairy-based food, though, that it tends to brown on the bottom of the pan. But it always tastes delicious and doesn’t separate or turn grainy like traditional caramels often do with the slightest change in humidity. If you do find brown spots in your caramel, you can easily pour it through a sieve as you pour onto the cookie sheet. Just be careful of your hands because the caramel is boiling hot.

*Tip: Use the ice water method to test for your desired texture. One time we poured the caramel out too early even though we thought it had reached the correct temperature, and it was far too soft after we let it sit overnight. So we put the caramel back in the pan with a tiny bit of water, then brought it back up to the right temperature. And we had a bowl of ice water on hand. Then we’d drop a tiny ball of caramel into it, and once it had cooled for a few seconds to room temperature, we’d take a bite to see if it was firm enough without getting crunchy. We’ve also done this when the caramel turned out too hard–reheated it with a little water to the correct temperature and then tested it with ice water. It did come out softer the second time. Haha, we call the redo caramels “Repentance Caramels”–a good reminder that you’re never too far gone to come back and be great.

And luckily this one is naturally gluten free.

Caramels

  • Servings: one large cookie sheet
  • Difficulty: medium
  • Print


“Never fail” and easier than regular caramels.

Ingredients

2 c. or equal of all ingredients:

  • Sweetened Condensed Milk
  • White Corn Syrup
  • Butter
  • Brown Sugar
  • White Sugar

Directions

Butter a cookie sheet and place on a large pot holder. Place all ingredients in a heavy pan, then turn the heat to medium-low and stir constantly or it may leave chunks or specks. Cook to between soft and firm ball stage (242° at sea level, 232° at high altitude). Stir very well near the end, scraping the bottom of the pan because it tends to brown. (Tip: Use ice water method to test for desired texture, dropping a small ball of hot caramel into a bowl of ice water, then taking out and testing texture with your fingers and your mouth.) Once you’ve reached the desired texture, pour onto buttered cookie sheet and leave on level surface undisturbed for 12-14 hours. Cut into small squares and wrap in waxed paper.