Cinnamas Cookies

In 2021, Jeff and I entered a Christmas cookie contest for Go Bold with Butter. Jeff wanted a fun cinnamon cookie, and this was the recipe he developed, adapted from a delicious sugar cookie recipe.

I haven’t made this one gluten free yet, but if you’re making it gluten free, of course just use a gluten free flour blend with xanthan gum, plus a few tablespoons extra. 

“Cinnamas Cookies

  • Servings: about 36 cookies
  • Difficulty: medium
  • Print


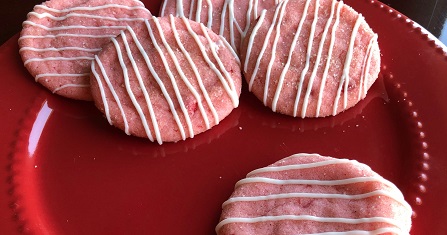
Don’t chill the dough–the Red Hots tend melt out more when chilled.

Ingredients

  • 1 c. Butter, softened

  • 1 1/2 c. Sugar

  • 1/2 tsp. (1/2 dram) Super Strength Cinnamon Candy/Baking Flavoring (aka cinnamon candy oil)

  • 1 Egg

  • 2 1/2 c. Flour (or gluten free flour with xanthan gum, plus a few tablespoons extra)

  • 1 tsp. Baking Powder

  • 1/2 tsp. Salt

  • Red Food Coloring to desired color

  • 1/3 c. Red Hots cinnamon candies

  • 1/2 c. Sugar for rolling cookies

  • 1/2 tsp. Cinnamon

  • 1/2 c. White Candy Melts or vanilla candy coating, melted

Directions

Preheat oven to 350°. For the tallest cookies, line the cookie sheets with parchment paper. Beat the butter and 1 1/2 c. sugar until light and fluffy. Then add the egg and mix well. Pour in the cinnamon oil and mix well. Add flour, baking powder, and salt, and mix until combined. Add red food coloring as desired and mix well. Place the red cinnamon candies in a zippered plastic bag, then crush with a rolling pin until they’re small pieces about 1/3 their normal size. (Large pieces can melt out.) Stir the broken candy into the dough. In a small bowl, combine the 1/2 cup sugar with cinnamon and stir. Drop the dough by rounded tablespoons into the cinnamon sugar and roll around to coat. Use a cookie scoop for best results. Afterwards place the dough on the lined cookie sheet, leaving about 2 inches of space between each cookie. Bake for 8-10 minutes until lightly browned. Do not overbrown. When the cookies are cooled, melt the white candy melts and spoon into a plastic sandwich bag. Snip off a small corner of the bag and quickly stripe the cookies with vertical lines.


“Frosting the Snowman” Carrot Cake Cookies

Haha, Jeff and I decided to enter a Christmas cookie contest in 2021 for Go Bold with Butter. I wanted something that was visually interesting but easy to create–a snowman! But how do you make a cookie look like a snowman? Then it hit me in the middle of the night when I was brainstorming–frosting! Frosting the snowman! And it could be a carrot cake cookie, so his carrot nose would be perfect! How could it not win some sort of prize, with a clever name, a cute look, delicious cream cheese frosting, and even a gluten free option? Haha, needless to say, the recipe didn’t win ANY sort of prize. Seems like the prizes all went to the cookies with coffee or alcohol in them. Haha. Oh well, I enjoyed my cookies.

If you’re making it gluten free, of course just use a gluten free flour blend with xanthan gum. Also make sure your nuts don’t say that they may contain wheat.

“Frosting the Snowman” Carrot Cake Cookies

  • Servings: 40-42 cookies
  • Difficulty: medium-hard
  • Print


Time-consuming but festive for Christmas.

Ingredients

Cookie batter:

  • 1 c. Butter, softened

  • ¾ c. Sugar

  • ¾ c. Brown Sugar, packed

  • 2 Eggs

  • 1 tsp. Vanilla

  • 2 ½ c. Flour (or 2 ¾ c. gluten free cup-for-cup flour)

  • 2 tsp. Baking Soda

  • 2 tsp. Cinnamon

  • ½ tsp. Ginger

  • ½ tsp. Ground Cloves

  • ½ tsp. Nutmeg

  • ½ tsp. Salt

  • 2 c. Grated Carrots (generally 4-6 carrots, depending on size)

  • 1 ½ c. Chopped Pecans (optionally toasted for best flavor) (check for gluten free)

Frosting:

  • ½ c. Butter, softened

  • 8 oz. Cream Cheese, softened

  • 2 tsp. Vanilla

  • 3 c. Powdered Sugar

  • 1/8 tsp. Salt (optional)

  • Orange and black food coloring

Directions

For cookie batter: Preheat oven to 350°. Beat together the butter, sugar, and brown sugar until creamy and lighter in color. Scrape down sides, then add the eggs and vanilla, and mix until combined. Add the dry ingredients (flour, baking soda, cinnamon, ginger, cloves, nutmeg, and salt) and mix well. Add the carrots and pecans and mix well. On a greased cookie sheet, spoon a rounded tablespoon in a nice circular, tall mound for the snowman’s head. Leave 1-2 inches between each mound. (The cookies will spread a little and have a cakey texture.) Bake 11-13 minutes until golden brown.

For frosting: Beat together the butter and cream cheese until creamy. Add the vanilla, powdered sugar, salt (if using), and mix until smooth. Set aside ½ cup frosting to color for the face. Color half the reserved frosting orange and the other half black.

To decorate: Frost each cookie with a circle of white frosting. Place the orange and black frosting in plastic sandwich bags and cut off a tiny corner. Then pipe an orange carrot in the middle of the cookie for a nose. Finish by piping black eyes and a smile.

(Tip: For the gluten free version, make sure to spoon the flour into the measuring cup and level off with a knife.)


Russian Tea Cookies

These cookies have a lot of names, but we always called them Russian Tea Cookies. And they’re traditional at our house at Christmastime. We make big batches and add them to cookie plates for our neighbors.

If you’re making this one gluten free, you’ll just want to use cup for cup flour instead of regular flour. It turns out great! Just be extra careful when rolling in powdered sugar because they fall apart more easily.

Russian Tea Cookies

  • Servings: 36
  • Difficulty: medium
  • Print


Small, popable cookies great for Christmas.

Ingredients

  • 1 c. Butter, softened
  • ½ c. Powdered Sugar
  • 1 tsp. Vanilla
  • 2 ¼ c. Flour (or gluten free flour with xanthan gum)
  • ¼ tsp. Salt
  • ¾ c. Finely Chopped Nuts (Walnuts or Pecans)
  • Powdered Sugar

Directions

In a large bowl, beat butter, powdered sugar, and vanilla together until light and fluffy. Add flour, salt, and nuts. Mix well. Roll dough into 1-inch balls and place them on an ungreased baking sheet. Bake at 350° for 10-12 minutes until set but not brown. While cookies are still warm, roll them in powdered sugar. Cool and roll in powdered sugar again. Makes 3 dozen.


Peanut Brittle

In the family recipes, this was labeled as “Buttery Peanut Brittle”–and it definitely is buttery. That might be what makes it better than most. I love it at Christmas and probably end up eating more than we deliver to neighbors and friends. Haha. This was also a great treat for me when I had to do the FODMAP diet.

The original recipe calls for 2 c. peanuts, but I want it insanely loaded with peanuts, so I upped it to 3 c. Also, sometimes raw peanuts are really hard to find. We have made this with unsalted roasted peanuts when we couldn’t find raw peanuts. It’s still delicious but obviously has a slightly different taste and texture.

And thankfully this one is naturally gluten free. Just check your nuts that they don’t say they may contain wheat.

Peanut Brittle

  • Servings: 8?
  • Difficulty: medium
  • Print


Crunchy, buttery, and bursting with peanuts.

Ingredients

  • 2 c. Sugar
  • 1 c. Light Corn Syrup
  • 1/2 c. Water
  • 1 c. Butter
  • 2 – 3 c. Raw Peanuts (a 16 oz. bag is about 3 c.) (check for gluten free)
  • 1 tsp. Baking Soda

Directions

Line two cookie sheets with foil and butter them, then place the pans on hot pads. In a heavy saucepan, combine sugar, corn syrup, and water. Cook and stir until sugar dissolves. When syrup boils, blend in butter. Stir frequently after the mixture reaches 230°. Add peanuts when the temperature reaches soft crack stage (around 280°) and stir constantly until the temperature reaches hard crack stage (around 305°). (You may want to use the ice water method to check for desired texture.) Remove from heat and quickly stir in soda. Mix thoroughly. Pour onto prepared cookie sheets. As candy cools, stretch it out thin by lifting and pulling from edge, using forks. Loosen from pans as soon as possible and break into pieces.


English Toffee

Another candy in our Christmas triumvirate: English toffee. Haha, with the other two being caramels and peanut brittle. I’m sure most recipes call for a specific temperature, but my mom would always say to cook it until it almost smells like it’s starting to burn. But lately I’ve been doing the ice water test to make sure it’s crunchy enough. Every once in a while this toffee can get a little grainy or not as hard as I want, but it’s so delicious that we don’t really care and still eat the slightly off batches.

You can kind of use any milk chocolate that you’d like–I remember my mom taking the plain Hershey bars from the miniatures collection or the Nuggets collection that no one wanted and melting them on top of the toffee. What a great use of the boring chocolate that everyone left behind. Haha. We’ve also made this toffee with pecans and sliced almonds instead of walnuts–both were great. So pick your favorite nut and try it out.

And thank goodness this one is naturally gluten free. Just make sure your nuts don’t say that they may contain wheat.

English Toffee

  • Servings: 1 pan
  • Difficulty: medium
  • Print


Crunchy, chocolatey, and perfect for Christmas.

Ingredients

  • 1 c. Butter
  • 1 c. Sugar
  • 2 Tbsp. Water
  • 2 c. Milk Chocolate Chips
  • ½ c. Chopped Walnuts (or desired nuts) (check for gluten free)

Directions

Pour a scant layer of chopped nuts on a foil-lined baking sheet. Mix butter, sugar, and water in heavy pan. Melt and bring to boil, stirring constantly. Cook about 5 minutes or until syrup turns a darker color and begins to smell like it’s burning, generally between soft and hard crack or around 270 or so. (You may want to try the ice water test to make sure it’s your desired texture.) Pour immediately onto foil-lined pan. Sprinkle top of hot candy with chocolate chips. Let melt and spread with knife to cover. Sprinkle with chopped nuts. Let cool completely so chocolate is solidified. Lift candy slab from foil and break into pieces.


Ginger Snaps

These ginger snaps are actually soft and delightful, so maybe they aren’t technically snappy. But they’re amazing for Christmas. This recipe comes from my sister-in-law Stephanie’s family, and they are always a delightful spiced addition to any cookie plate.

If you’re making this one gluten free, I haven’t tried it yet. But all the ingredients except the flour are naturally gluten free, so I’ll just try swapping out gluten free flour for regular flour.

Ginger Snaps

  • Servings: haha, a lot?
  • Difficulty: medium
  • Print


Soft, full of spices, and perfect for Christmas.

Ingredients

  • 3 c. Sugar
  • ¾ c. Butter
  • 1 ½ Shortening
  • 3 Eggs
  • ¾ c. Molasses
  • 5 c. Flour (or gluten free flour with xanthan gum)
  • 4 ½ tsp. Baking Soda
  • 3 tsp. Cinnamon
  • 1 ½ tsp. Salt
  • 1 ½ tsp. Ginger
  • 1 ½ tsp. Allspice

Directions

Beat sugar, butter, shortening, eggs, and molasses. Add dry ingredients and mix well. Roll into balls and drop into sugar. Bake on greased cookie sheets at 350° for 10 minutes.


Carrot Cookies

My grandma made these every year for Christmas, and they inevitably ended up on a plate of goodies that we delivered to each of her neighbors. Yes, they’re called “Carrot Cookies”–but the flavors that really come through are the orange in the glaze and the walnuts in the cookies. The texture is more cakey than a traditional cookie, but I always forget how delicious these carrot cookies are. They’re one of my brother’s very favorite cookies.

For gluten free, they turn out great. Just substitute the flour with cup for cup gluten free flour, plus a few tablespoons extra. Also make sure your walnuts don’t say “may contain wheat.”

Carrot Cookies

  • Servings: 38
  • Difficulty: medium
  • Print


A cakey Christmas cookie, with flavors of orange and walnut.

Ingredients

Cookies

  • 1 c. Sugar
  • 1 c. Shortening
  • 1 Egg
  • 1 c. Grated Carrots (about 2 large carrots)
  • 1/2 c. Water
  • 1 tsp. Vanilla
  • 1/2 c. Walnuts or Pecans, chopped (check for gluten free)
  • 2 1/4 c. Flour (or gluten free flour with xanthan gum, plus a few tablespoons extra)
  • 1 Tbsp. Baking Powder
  • ½ scant tsp. Salt

Icing/Glaze

  • 2 c. Powdered Sugar
  • Juice and grated Rind of 1 Orange

Directions

For cookies, combine sugar, shortening, and egg. Add remaining ingredients. Stir well; drop on greased cookie sheet and bake at 350° for 14 minutes.

For icing, mix together ingredients, and frost cookies while they’re still warm but not extra hot. Add more powdered sugar if not thick enough. Makes about 38 cookies.


Caramels

These caramels are a Christmas tradition every year in my house, and we often give them to neighbors as a gift. In my mom’s recipe box, this was labeled “Never Fail Caramels” because unlike regular finicky caramels, these ones aren’t difficult to make. Plus, the recipe is VERY simple–just the same amount of every ingredient.

I wouldn’t say these caramels NEVER have any issues, because you do have to stir pretty well or you’ll end up with brown specks in your caramel. That’s pretty common for any dairy-based food, though, that it tends to brown on the bottom of the pan. But it always tastes delicious and doesn’t separate or turn grainy like traditional caramels often do with the slightest change in humidity. If you do find brown spots in your caramel, you can easily pour it through a sieve as you pour onto the cookie sheet. Just be careful of your hands because the caramel is boiling hot.

*Tip: Use the ice water method to test for your desired texture. One time we poured the caramel out too early even though we thought it had reached the correct temperature, and it was far too soft after we let it sit overnight. So we put the caramel back in the pan with a tiny bit of water, then brought it back up to the right temperature. And we had a bowl of ice water on hand. Then we’d drop a tiny ball of caramel into it, and once it had cooled for a few seconds to room temperature, we’d take a bite to see if it was firm enough without getting crunchy. We’ve also done this when the caramel turned out too hard–reheated it with a little water to the correct temperature and then tested it with ice water. It did come out softer the second time. Haha, we call the redo caramels “Repentance Caramels”–a good reminder that you’re never too far gone to come back and be great.

And luckily this one is naturally gluten free.

Caramels

  • Servings: one large cookie sheet
  • Difficulty: medium
  • Print


“Never fail” and easier than regular caramels.

Ingredients

2 c. or equal of all ingredients:

  • Sweetened Condensed Milk
  • White Corn Syrup
  • Butter
  • Brown Sugar
  • White Sugar

Directions

Butter a cookie sheet and place on a large pot holder. Place all ingredients in a heavy pan, then turn the heat to medium-low and stir constantly or it may leave chunks or specks. Cook to between soft and firm ball stage (242° at sea level, 232° at high altitude). Stir very well near the end, scraping the bottom of the pan because it tends to brown. (Tip: Use ice water method to test for desired texture, dropping a small ball of hot caramel into a bowl of ice water, then taking out and testing texture with your fingers and your mouth.) Once you’ve reached the desired texture, pour onto buttered cookie sheet and leave on level surface undisturbed for 12-14 hours. Cut into small squares and wrap in waxed paper.


Prime Rib

When I was in my 20s, our family starting making Prime Rib every Christmas Eve, served with baked potatoes and cheesy broccoli. And maybe razzleberry pie or frozen cheesecake bites for dessert. My brothers like having the savory horseradish cream instead of straight up horseradish also. It’s such a wonderful tradition, and the one time of year when you can justify spending so much on meat for a meal.

We’ve tried a few different methods of cooking prime rib. Originally we used a method of turning the oven off for two hours, but sometimes it was extremely rare in the middle. And we’ve tried roasting it just like a roast beef. Lately we’ve been using the reverse searing method, which works pretty well. They suggest letting it dry out in your fridge overnight beforehand for a nicer crust, but I never remember to do that and it’s still delicious.

And of course this one is naturally gluten free.

This method comes from sweetandsavorybyshinee.com. This chart is helpful, haha, even though I’m realizing it has a typo that says “eastimated.”

Make it a meal with:

  • Baked Potatoes or Twice Baked Potatoes
  • Cheesy Broccoli
  • Mixed Berries or Fruit Salad
  • Razzleberry Pie or Cheesecake Bites

Prime Rib

  • Servings: 10?
  • Difficulty: medium
  • Print


Perfect for Christmas Eve. Remember to let it sit about 2 hours on your counter before roasting.

Ingredients

Roast

  • 6-8 lb. Boneless Beef Rib Roast
  • Generous salt and pepper
  • Onion Powder
  • Garlic Powder

Horseradish Cream

  • 2 c. Whipping Cream, whipped
  • ½ tsp. Salt
  • 6 Tbsp. grated Horseradish, pressed dry (squeeze all liquid out)

Directions

For the roast, place the unwrapped roast on a cookie sheet and generously salt all over, then place in the fridge overnight to dry it and create a nice crust (it’s ok if you forget this step). Then 1-2 hours before roasting (depending on roast size), take the roast out of the fridge and bring it to room temperature. Then season all over with pepper, onion powder, and garlic powder. Push a thermometer in the middle of the roast, place the roast fat side up on a greased roasting pan (with foil in the bottom for easier cleaning), and cook at 200° for about 3.5 hours (or according to time on the chart) or until the internal temperature reaches 120°. *Note: If you use a convection oven, the cook time is a little less, so keep an eye on your thermometer. Remove from oven, then cover with foil and let it rest for about 30 minutes. Increase the oven temperature to 500° and roast for 6-10 minutes until crisp and brown on the outside. The internal temperature should be 135° for medium rare. For easier slicing, cut off the bone before slicing.

For hoseradish cream, whip cream and fold in other ingredients. Taste for flavor and add salt as needed.


Crepes

Crepes are always a lot of fun and are great for special occasions. We often make crepes for date night, and we always make them on Christmas for a brunch with family. Haha, usually when we make them for date night, we end up standing the whole time while we eat because we stand by the stove and eat them as they come off the pan. They do tend to cool down very quickly, so we try to add Nutella quickly so it’ll melt a little. If you’re going to make a lot for a big event, make sure to start a long time before the event (like an hour) because they do take time.

For date night, we usually stick to ham, cheese, and broccoli crepes for the savory. Then for the sweet ones, we usually fill them with Nutella, peanut butter, and bananas. And sometimes also strawberries. And of course whipped cream.

But for Christmas, we go all out and make a crepe bar with all sorts of toppings. For example, we might have the standard ham and cheese, cooked broccoli, bananas, strawberries, Nutella, peanut butter, other berries, rotisserie chicken pieces, peppers, scrambled eggs, salsa, sausage, bacon, green onions, nuts for sweet crepes, whipped cream, powdered sugar, jam, and even pizza toppings like pasta sauce, mozzarella, and pepperoni. You can also have some sides with it, like rosemary potatoes (which works well if we have leftover baked potatoes from Christmas Eve dinner the night before) or wild rice. I’ve even made the sauce from our cordon bleu recipe, which tastes great with rotisserie chicken crepes, but I think most people weren’t sure what the sauce would taste like and so avoided it. Since the crepes cool so quickly, you may want to have an electric skillet out to heat up the crepes or let people microwave them to melt the cheese.

If you’re making it gluten free, of course replace the regular flour with cup for cup gluten free flour and add a tablespoon or two extra to make it the right consistency. We’ve done it a few times without adding the extra flour, and it’s been so thin that they ripped like crazy. But it works well when you add a little extra. Of course if you’re having an event with both regular and gluten free crepes, just be careful if you’re trying to avoid cross contamination to make your gluten free crepes first and take your toppings before everyone else. And make sure to use fresh or dedicated peanut butter, Nutella, jam, etc. so you don’t end up with people’s crumbs from previous uses. I’ve also made it dairy free with almond milk.

Make it a meal with:

  • Sausage
  • Scrambled Eggs
  • Rosemary Potatoes
  • Juice

Crepes

  • Servings: 10?
  • Difficulty: easy
  • Print


Fun for dates and special occasions, but they get cold quickly.

Ingredients

  • 1 ½ c. Milk (or almond milk for dairy free)
  • 2 Eggs
  • 1 c. Flour (or gluten free flour with xanthan gum, plus a few tablespoons extra)
  • ¼ tsp. Salt
  • 1 Tbsp. Oil

Topping suggestions

  • Ham Slices
  • Cheese Slices or Shredded Cheese
  • Cooked Broccoli
  • Rotisserie Chicken
  • Nutella
  • Peanut Butter
  • Sliced Bananas
  • Sliced Strawberries
  • Whipped Cream

Directions

Place liquid ingredients in the bottom of a blender, then add rest of ingredients and blend until very smooth. About 3 Tbsp. of batter per crepe makes 10-12 crepes. Heat a pan over medium-high heat and butter the bottom of the pan. Then add the batter and swirl around to cover the bottom of the pan. When the edges are starting to peel away from the edge, use a spatula to flip. For ham, cheese, and broccoli crepes, now is the time to add about 2 cheese slices to the pan, then 4 slices of ham on top. Then add a few broccoli florets and roll up the crepe. For sweet crepes, take the crepe out of the pan after flipping, and while it’s hot, spread Nutella and peanut butter down the middle of the crepe, then add banana and strawberries, then roll up.