GF Pizza Crust

For basically every recipe, I prefer to have a gluten free version of the regular one. But pizza crust is just so different. Gluten is so integral to that stretchy, elastic dough. So I searched out a gluten free version. With gluten free, you basically always get a dough that looks more like Play D’oh or frosting, then you spread it out on parchment paper. I found this recipe on glutenfreepalate.com and am posting it here (slightly modified) so I don’t have to scroll through tons of pages of text and ads (and because I don’t make any money off this blog–it’s just so I have an electronic version of my own recipe book). If you’d like more details and pictures, make sure to visit their website.

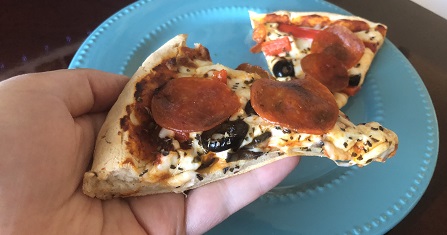
In any event, this recipe is great because you don’t need to wait for it to rise. You can also bake a crust and freeze it to top later. Of course you don’t get fluffy, airy crusts, but it’s easy, chewy, and delicious, and you can make it as thick as you want. That’s one of the things about gluten free crusts–a lot of restaurants use the Udi’s crust, which is fine but thin–more like a really thick tortilla. So it’s refreshing to make it thicker. Here’s a picture of the thickness that I make (the black specks are extra basil on top):

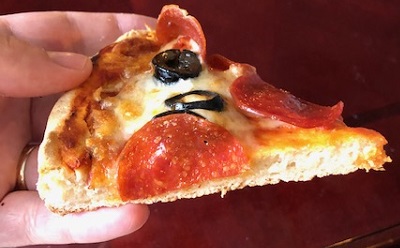
Here’s an even thicker one:

Make it a meal with:

  • Green Salad
  • Root Beer

Gluten Free Pizza Crust

  • Servings: 1 pizza
  • Difficulty: easy-medium
  • Print


Chewy, easy, and delightful.

Ingredients

  • 3/4 c. Warm Water
  • 1 Tbsp. Sugar

  • 1 pkg. Yeast
  • 2 c. Gluten Free Flour with Xanthan Gum (like Bob’s Red Mill cup for cup)

  • 1 tsp. Salt

  • 1 Egg
  • 1 Tbsp. Olive Oil

  • 1 tsp. Vinegar

Directions

Place a pizza stone in the oven and preheat to 450°. In the bowl of a stand mixer, place water, sugar, and yeast, and let it sit for about 5 minutes or until it’s foamy. (Note: For measuring gluten free flour, always spoon into the measuring cup and level off with a knife instead of scooping out with the measuring cup.) Add the rest of the ingredients and mix with the paddle attachment on low speed for 1 minute. Using an oiled spatula, scrape the dough onto a sheet of parchment paper and use oiled hands to spread into your desired size and shape (about 10-12″). Place the parchment on the pizza stone and bake for 10 minutes or until slightly golden brown. Carefully remove from oven with the paper (remember parchment can get brittle and break easily after baking), then add toppings, return with paper to the stone, and bake for another 10-15 minutes until golden brown.


Buttercream Frosting

There are lots of buttercream frosting recipes out there. But I loved the frosting on Harmons cakes and celebration cookies. Luckily the Harmons chefs shared the recipe with me (which I’m sure has changed by now anyway), and I’ve used it many times. I’ve even used it as a base for flavored buttercreams as well.

And thank goodness this one is naturally gluten free.

Buttercream Frosting

  • Servings: 12?
  • Difficulty: easy
  • Print


Perfect for cakes or sugar cookies.

Ingredients

  • 1 lb. Butter (aka 1 box)
  • 2 lb. Powdered Sugar (aka 1 large bag)
  • 1 Tbsp. Vanilla
  • 1/4 c. Water

Directions

Beat butter well. Slowly incorporate sugar. Scrape down, then mix in vanilla. Then mix in water. (For strawberry buttercream, replace the water with 1/2 c. fresh or frozen strawberries, pureed and strained.)


Russian Tea Cookies

These cookies have a lot of names, but we always called them Russian Tea Cookies. And they’re traditional at our house at Christmastime. We make big batches and add them to cookie plates for our neighbors.

If you’re making this one gluten free, you’ll just want to use cup for cup flour instead of regular flour. It turns out great! Just be extra careful when rolling in powdered sugar because they fall apart more easily.

Russian Tea Cookies

  • Servings: 36
  • Difficulty: medium
  • Print


Small, popable cookies great for Christmas.

Ingredients

  • 1 c. Butter, softened
  • ½ c. Powdered Sugar
  • 1 tsp. Vanilla
  • 2 ¼ c. Flour (or gluten free flour with xanthan gum)
  • ¼ tsp. Salt
  • ¾ c. Finely Chopped Nuts (Walnuts or Pecans)
  • Powdered Sugar

Directions

In a large bowl, beat butter, powdered sugar, and vanilla together until light and fluffy. Add flour, salt, and nuts. Mix well. Roll dough into 1-inch balls and place them on an ungreased baking sheet. Bake at 350° for 10-12 minutes until set but not brown. While cookies are still warm, roll them in powdered sugar. Cool and roll in powdered sugar again. Makes 3 dozen.


Rice Krispie Treats

Haha, I suppose if you want to get eyerolls but also be technically correct, it would be Rice Krispies Treats. But who ever calls it that? In any event, I really like this version of the recipe that Jeff’s family would make, with extra marshmallows and butter. Not dry or stale at all. I remember taking these to a family event one time, and I think everyone thought, “Oh, Rice Krispie Treats. Meh. I guess I’ll take a small square.” But then after partaking of the buttery, gooey goodness, everyone ended up having large seconds or thirds. And we ate the whole pan.

If you’re making this one gluten free, make sure to use a gluten free cereal like Malt O’ Meal Crispy Rice. Don’t use Kellogg’s Rice Krispies, because they have malt flavoring, which contains gluten.

Rice Krispie Treats

  • Servings: 12?
  • Difficulty: easy
  • Print


Gooey, buttery, and better than your average Rice Krispie Treat.

Ingredients

  • 10 Tbsp. Butter
  • 2 pkgs. Marshmallows (10 oz each)
  • 12 oz. box Rice Krispies (or Malt O’ Meal Crispy Rice)

Directions

On stove, combine butter and marshmallows, heating and stirring until melted. OR for microwave, melt butter and then add marshmallows and microwave 90 seconds. Stir and add cereal immediately, mixing well. Press into greased 9×13 pan. Add mini M&Ms or chocolate chips if desired. Cool completely.


Peanut Brittle

In the family recipes, this was labeled as “Buttery Peanut Brittle”–and it definitely is buttery. That might be what makes it better than most. I love it at Christmas and probably end up eating more than we deliver to neighbors and friends. Haha. This was also a great treat for me when I had to do the FODMAP diet.

The original recipe calls for 2 c. peanuts, but I want it insanely loaded with peanuts, so I upped it to 3 c. Also, sometimes raw peanuts are really hard to find. We have made this with unsalted roasted peanuts when we couldn’t find raw peanuts. It’s still delicious but obviously has a slightly different taste and texture.

And thankfully this one is naturally gluten free. Just check your nuts that they don’t say they may contain wheat.

Peanut Brittle

  • Servings: 8?
  • Difficulty: medium
  • Print


Crunchy, buttery, and bursting with peanuts.

Ingredients

  • 2 c. Sugar
  • 1 c. Light Corn Syrup
  • 1/2 c. Water
  • 1 c. Butter
  • 2 – 3 c. Raw Peanuts (a 16 oz. bag is about 3 c.) (check for gluten free)
  • 1 tsp. Baking Soda

Directions

Line two cookie sheets with foil and butter them, then place the pans on hot pads. In a heavy saucepan, combine sugar, corn syrup, and water. Cook and stir until sugar dissolves. When syrup boils, blend in butter. Stir frequently after the mixture reaches 230°. Add peanuts when the temperature reaches soft crack stage (around 280°) and stir constantly until the temperature reaches hard crack stage (around 305°). (You may want to use the ice water method to check for desired texture.) Remove from heat and quickly stir in soda. Mix thoroughly. Pour onto prepared cookie sheets. As candy cools, stretch it out thin by lifting and pulling from edge, using forks. Loosen from pans as soon as possible and break into pieces.


Ginger Snaps

These ginger snaps are actually soft and delightful, so maybe they aren’t technically snappy. But they’re amazing for Christmas. This recipe comes from my sister-in-law Stephanie’s family, and they are always a delightful spiced addition to any cookie plate.

If you’re making this one gluten free, I haven’t tried it yet. But all the ingredients except the flour are naturally gluten free, so I’ll just try swapping out gluten free flour for regular flour.

Ginger Snaps

  • Servings: haha, a lot?
  • Difficulty: medium
  • Print


Soft, full of spices, and perfect for Christmas.

Ingredients

  • 3 c. Sugar
  • ¾ c. Butter
  • 1 ½ Shortening
  • 3 Eggs
  • ¾ c. Molasses
  • 5 c. Flour (or gluten free flour with xanthan gum)
  • 4 ½ tsp. Baking Soda
  • 3 tsp. Cinnamon
  • 1 ½ tsp. Salt
  • 1 ½ tsp. Ginger
  • 1 ½ tsp. Allspice

Directions

Beat sugar, butter, shortening, eggs, and molasses. Add dry ingredients and mix well. Roll into balls and drop into sugar. Bake on greased cookie sheets at 350° for 10 minutes.


Dump Cake

Dump cake is the go-to, easy dessert when camping (haha, besides s’mores, naturally). Of course it’s called a dump cake because you basically just dump everything into the pot and let it bake. I’ve made this in a regular pot in the oven, as well as a Dutch oven over coals. Whatever you prefer, it’s going to be delicious.

Man, I made this gluten free once and it turned out really weird and rubbery. Maybe it was just the specific cake mix I used, but it was not pleasant. Maybe I’ll try it again later with a different cake mix.

Dump Cake

  • Servings: 8?
  • Difficulty: easy
  • Print


An easy and delicious dessert, perfect for camping.

Ingredients

  • 1 Cake Mix (or gluten free cake mix)
  • 1 can Pie Filling
  • 1 can Sprite
  • ½ c. Butter, melted

Directions

Make using a conventional oven or Dutch oven. For Dutch oven, use 12”. Place foil in Dutch oven or pot if baking in conventional oven, and spray foil with cooking spray. Place pie filling in bottom, then sprinkle cake mix on top. Pour Sprite over all. For Dutch oven, cover and place 15 coals on top and 9 on bottom. Turn lid ¼ turn every 12 minutes, for 45 minutes total cooking. For conventional oven, don’t cover. Bake at 350° for 45+ minutes until golden. During the last 5 minutes, pour melted butter over top. Serve hot with whipped cream or ice cream.


Carrot Cookies

My grandma made these every year for Christmas, and they inevitably ended up on a plate of goodies that we delivered to each of her neighbors. Yes, they’re called “Carrot Cookies”–but the flavors that really come through are the orange in the glaze and the walnuts in the cookies. The texture is more cakey than a traditional cookie, but I always forget how delicious these carrot cookies are. They’re one of my brother’s very favorite cookies.

For gluten free, they turn out great. Just substitute the flour with cup for cup gluten free flour, plus a few tablespoons extra. Also make sure your walnuts don’t say “may contain wheat.”

Carrot Cookies

  • Servings: 38
  • Difficulty: medium
  • Print


A cakey Christmas cookie, with flavors of orange and walnut.

Ingredients

Cookies

  • 1 c. Sugar
  • 1 c. Shortening
  • 1 Egg
  • 1 c. Grated Carrots (about 2 large carrots)
  • 1/2 c. Water
  • 1 tsp. Vanilla
  • 1/2 c. Walnuts or Pecans, chopped (check for gluten free)
  • 2 1/4 c. Flour (or gluten free flour with xanthan gum, plus a few tablespoons extra)
  • 1 Tbsp. Baking Powder
  • ½ scant tsp. Salt

Icing/Glaze

  • 2 c. Powdered Sugar
  • Juice and grated Rind of 1 Orange

Directions

For cookies, combine sugar, shortening, and egg. Add remaining ingredients. Stir well; drop on greased cookie sheet and bake at 350° for 14 minutes.

For icing, mix together ingredients, and frost cookies while they’re still warm but not extra hot. Add more powdered sugar if not thick enough. Makes about 38 cookies.


Diana’s Popcorn

We don’t make this one too often. This popcorn is kind of a variation of caramel corn–like a sweet and salty caramel corn mixed with Rice Krispie Treats. But it’s chewy, not crunchy. You’ll probably want to eat this one while it’s warm because it does tend to clump together when it’s cold and then it gets hard to eat. Also make sure to choose a microwave popcorn that you like to eat by itself, because you can taste the popcorn.

And this one is naturally gluten free.

Diana's Popcorn

  • Servings: 8?
  • Difficulty: easy
  • Print


Like a chewy, sweet and salty caramel corn. Best eaten warm.

Ingredients

  • 2 bags Microwave Popcorn, popped
  • 1/2 c. Butter
  • 1 c. Brown Sugar
  • 14-18 large Marshmallows

Directions

In glass bowl, microwave butter 1 minute. Stir in brown sugar, microwave 1 minute. Stir in marshmallows, microwave 1 minute. Stir well and pour over popcorn, and mix well.


Crunchy Classic Caramel Corn

If you’re looking for a classic, fully crunchy, perfect caramel corn, this one will take you back to memories of the fair, with sweet aromas in the air. This is adapted from a Karo recipe, and it does take a fair amount of time–but the time in the oven helps makes it nice and crunchy instead of chewy, like you often get with quick caramel corn. If you’re looking for a quick caramel corn instead, try this one

If you don’t have Silpats, you can also try spraying the pan or aluminum foil with cooking spray. Also, you can try adding mix ins, but you may want to increase the caramel. I’ve made it with 2 c. of pecans before, and it was delightful. You don’t even need to toast the pecans beforehand because they toast in the oven with the popcorn–and they’re reminiscent of delicious pecan pie.

And luckily this one is naturally gluten free. Just make sure you don’t use silpats that were used previously with gluten.

Crunchy Classic Caramel Corn

  • Servings: 8
  • Difficulty: medium
  • Print


Takes longer to make, but it’s so crunchy and delightful.

Ingredients

  • 4 qt. Popped Popcorn
  • 1 c. Brown Sugar
  • 1/2 c. White Corn Syrup
  • 1/2 c. Butter
  • 1/2 tsp. Salt
  • 1/2 tsp. Baking Soda
  • 1 tsp. Vanilla
  • Pecan halves (up to 2 c.) (optional)

Directions

Place Silpats on 2 cookie sheets. Place popcorn on the 2 sheets and place in a 250° oven. In a saucepan, combine sugar, butter, syrup, and salt, and boil for 5 minutes without stirring. Remove from heat and add baking soda and vanilla. Pour over warm popcorn, stir to coat, and bake for 45 minutes, stirring every 15 minutes. Cool, then break apart.