Microwave Caramel Corn

We made this with our mom quite a few times when we were little. It’s pretty fast and easy, but it doesn’t always get 100% crispy–sometimes it can be a little chewy, which some people enjoy. If you’re looking for totally crunchy caramel corn, try this recipe for Crunchy Classic Caramel Corn (but it does take much more time).

And luckily this one is naturally gluten free.

Microwave Caramel Corn

  • Servings: 8?
  • Difficulty: easy-medium
  • Print


Very fast and easy (sometimes chewy).

Ingredients

  • 15 c. unsalted popped Popcorn (about 2 batches from popcorn blower)
  • 1 large Paper Bag
  • ½ c. Butter
  • 1 c. Brown Sugar
  • 1/4 c. White Corn Syrup
  • ½ tsp. Baking Soda

Directions

Pop first batch of popcorn and place in paper bag (remove unpopped kernels). In large glass cup, microwave sugar, butter, and corn syrup for 1 ½ minutes to melt. Stir in baking soda. Pour ½ the liquid over popcorn. Close bag and shake. Pop second batch of popcorn and place in bag. Pour remaining liquid on top, then close bag and shake well. Microwave bag for 1 ½ minutes. Be careful not to overcook because it can burn. Shake bag again and cool before eating.


Aunt Twila’s Pecan Pie

I’m not a snob when it comes to lots of foods. Give me almost any ice cream or milk chocolate, and I’ll probably love it. But after having eaten my great-great Aunt Twila’s pecan pie, almost all other pecan pies pale in comparison. They always seem to be mostly goo with a sparse sprinkling of chopped pecans on the top. Haha, I love me some sweet goo, but I want a nice rich filling with big pecan halves on top. And that’s what this pie is. I love this pie so much that I even made it for my birthday cake one year.

I will say the hardest part of this pie is getting the middle done enough without going overboard. It’s much easier to underbake it than overbake it, though. In all my years of making this pie, I’ve underbaked it a handful of times and only overbaked it once. Just make sure that when you shake the pie, that it only has a slight jiggle and that the filling on top is golden brown (if it’s just yellow, it’s probably not done). Most years it seems that I bake it around 1 hour, but sometimes even up to 1 hour and 10 minutes.

If you’re making this gluten free, all the ingredients for the filling are naturally gluten free. Just make sure to use a gluten free pie crust.

Aunt Twila's Pecan Pie

  • Servings: 8
  • Difficulty: medium
  • Print


Very rich, amazing, and worthy of any Thanksgiving.

Ingredients

  • 1 c. White Karo Syrup
  • ¾ c. Sugar
  • ½ c. melted Butter
  • 3 Eggs
  • 1 tsp. Vanilla
  • 1 ½ c. Pecan Halves
  • 1 unbaked deep dish 9″ pie crust (or gluten free pie crust)

Directions

Mix together syrup and sugar. Add melted butter, then mix in eggs and vanilla. Let stand 1 hour. Place ¾ c. pecan halves in bottom of unbaked pie shell. Pour in filling and cover with remaining pecan halves. Bake at 325° for at least 50 minutes or until set. (Generally around an hour.)


Black Cat Cookies

If a brownie married a sugar cookie, you’d get these wonderful chocolate cookies. I think these are called “Black Cat Cookies” because they started as a recipe from one of those Halloween recipe books many years ago, like the small ones you’d find at the checkout stand. I remember the cats had candy corn eyes and red hot candies for a nose. We’ve made those, but I’ve also used cookie cutters to make bats, witches, cats, and vampires. The dough holds pretty well with the cookie cutters even after baking in the oven–I don’t bother rolling out the dough; I just smash pieces of the dough flat with a cup and then cut them out with the cutter.

If you’re making these gluten free, they turn out pretty well but do tend to crack a little. Just replace the flour with cup for cup gluten free flour and add a few tablespoons extra–and cook it the full amount of time, not the minimum. Here’s how the gluten free ones turn out:

Black Cat Cookies

  • Servings: 24
  • Difficulty: medium
  • Print


Rich, chocolatey, and great for Halloween.

Ingredients

  • 1 c. Butter, softened
  • 2 c. Sugar
  • 2 Eggs
  • 3 tsp. Vanilla
  • 3 c. Flour (or gluten free flour with xanthan gum, plus a few tablespoons extra)
  • 1 c. Baking Cocoa
  • ½ tsp. Baking Powder
  • ½ tsp. Baking Soda
  • ½ tsp. Salt

Directions

In a mixing bowl, cream butter and sugar. Beat in eggs and vanilla. Combine flour, cocoa, baking powder, baking soda, and salt; gradually add to creamed mixture. Roll dough into 1 ½ inch balls. Place 3 inches apart on lightly greased baking sheets. Flatten with a glass dipped in sugar. Pinch top of cookie to form ears. For whispers, press a fork twice into each cookie. Alternatively, you can press dough into cookie cutters, then remove and place on the cookie sheet and decorate with sprinkles. Bake at 350° for 10-12 minutes or until cookies are set. (Optional decoration: Immediately after removing from oven, press on candy corn for eyes and Red Hots for noses.) Makes 2 dozen.


Apple Crumb Pie

It isn’t Thanksgiving without apple pie. And for those of us who prefer their pie topped with sweet crumbles instead of dry pie crust, this is the winner. We make this every year the night before Thanksgiving, sometimes even making two pies. Just make sure to test your apples so they’re done to your level of preferred softness. This recipe is adapted from the famous Better Homes and Gardens red checked cookbook. That thing is full of lots of great recipes!

Also, of course apples vary in size. So I like to cut apples one at a time and place them in the pie crust before mixing with anything, just so I can make sure it’ll fit. It seems like a waste of apples if you cut them all only to find that they won’t all fit.

I haven’t made this one gluten free yet, but it should be easy enough to switch out gluten free flour (and make sure you use a gluten free pie crust). Or if you don’t want to bother with a gluten free pie crust, you can always opt to make gluten free apple crisp.

Apple Crumb Pie

  • Servings: 8
  • Difficulty: medium
  • Print


Sweet and perfect for Thanksgiving.

Ingredients

  • 2/3 c. Sugar
  • 2 Tbsp. Flour (or gluten free flour)
  • ¾ tsp. Cinnamon
  • 6 to 8 tart Apples, pared, cored, and sliced (6 cups)
  • 1 9-inch unbaked Pie Crust (or gluten free pie crust)
  • ½ c. Flour (or gluten free flour)
  • ¼ c. Sugar
  • ¼ c. Butter (usually use 6 Tbsp. butter for larger crumbles)

Directions

Combine first three ingredients; stir into apples. Then place in pie crust. Combine remaining flour and sugar; cut in butter till crumbly. Sprinkle the mixture over apples. Bake at 400° for 45-50 minutes or till done. If pie browns too quickly, cover edge with foil.


Easy Chicken and Rice Soup

Great for cold weather or when your stomach is upset, especially if you need something gluten free. This is adapted from a great recipe on twopeasandtheirpod.com

And as previously mentioned, this one is naturally gluten free.

Make it a meal with:

Easy Chicken and Rice Soup

  • Servings: 4
  • Difficulty: easy-medium
  • Print


Mild and great for cold weather or upset stomachs.

Ingredients

  • 1 Tbsp. Olive Oil
  • 1 Onion, chopped
  • 2 Garlic Cloves, minced (abt. 1 tsp. minced)
  • 2 medium Carrots, chopped
  • 2 Celery ribs, cut into 1/2-inch-thick slices
  • 1 tsp. + Dried Thyme Leaves
  • 1 Bay Leaf
  • 2 qts. Chicken Stock or Broth (I often just do 3 Tbsp. chicken base and 9 cups water)
  • 1 c. Water
  • 1/2 c. Rice, uncooked
  • 2 c. Shredded Cooked Chicken (can use about 1/2 rotisserie chicken)
  • Salt and Pepper to taste

Directions

Place a large pot over medium heat and add the olive oil. Add the onion, garlic, carrots, celery, thyme and bay leaf. Cook and stir for about 6 minutes, until the vegetables are softened but not browned. Pour in the chicken broth and water and bring to a boil. Add the rice and chicken; season with salt and pepper.
Cook on medium-low until the rice is tender, about 25-30 minutes.


Schnitzel

Haha, I think because of the restaurant Wienerschnitzel, people think schnitzel is going to be some sort of hot dog or sausage. I didn’t know what it was until my mission in Germany and Austria, then I had a lot of great schnitzel. I learned that schnitzel is really a breaded, fried cutlet of meat. “Schnitzel” kind of translates to small cut–like a cutlet. It’s reminiscent of chicken fried steak, made with either pork, chicken, or veal, depending on the geography. It’s not very flavorful, but it’s still a fun meal. This recipe is adapted from daringgourmet.com–she has lots of delicious German recipes.

I remember in Vienna, there was a restaurant that the missionaries called Herb’s–but it was really called Schnitzelwirt. It was like a rite of passage for an elder to finish the giant Wienerschnitzel and all the accompanying fries. I’m pretty sure I also did it–and I went back there with my mom when we went to visit. Traditionally schnitzel is served with fries and a lemon wedge–or maybe with potato salad.

If you’re making this gluten free, I have now made it with corn starch and Corn Chex crumbs–that’s the one in the photo. It turned out great, and I think I’ve heard that corn starch coatings make stuff nice and crisp.

Make it a meal with:

Schnitzel

  • Servings: 4
  • Difficulty: medium
  • Print


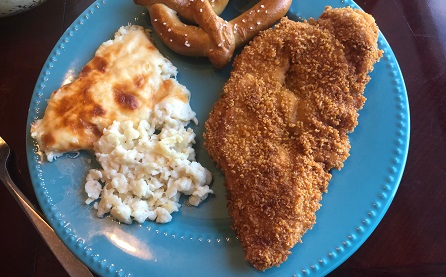
Serve with fries and a lemon wedge, for a wonderful German/Austrian meal.

Ingredients

  • 4 boneless Pork Steaks or Chops (you can also use chicken or veal)
  • Salt and Pepper to taste
  • 1/2 c. Flour combined with 1 tsp. salt (or gluten free flour or cornstarch)
  • 2 large eggs, lightly beaten
  • 3/4 cup plain breadcrumbs (or gluten free breadcrumbs or Corn Chex crumbs)
  • Oil for frying
  • Lemon wedges (optional)

Directions

Place the chops under plastic wrap and pound until they’re 1/4″ thick. Lightly season both sides with salt and pepper. Place the flour mixture, egg, and breadcrumbs in 3 separate shallow bowls. Dip the chops in the flour, then the egg, and then the breadcrumbs, coating both sides and all edges at each stage. Be careful not to press the breadcrumbs into the meat. Gently shake off the excess crumbs. Don’t let the schnitzel sit in the coating or they will not be as crispy once fried – fry immediately.
Make sure the cooking oil is hot enough at this point (about 330 degrees F) as you don’t want the Schnitzel to sit around in the coating before frying. Use enough oil so that the Schnitzels “swim” in it.
Fry the Schnitzel for about 2-3 minutes on both sides until a deep golden brown. Transfer briefly to a plate lined with paper towels. Optional: Squeeze a lemon wedge all over the schnitzel before eating.


Sweet Pork

This sweet pork comes from Mel’s Kitchen Cafe, and is a lot like Cafe Rio’s. It’s amazing, and we’ve made it for several large group events and birthday parties. Plus, pork shoulder is often on sale for 99 cents, so the meat is surprisingly cheap (although the sauces make it more costly).

It makes a lot, and we usually freeze the leftovers in quart bags to use in the future. You can use the sweet pork to make into sweet pork burritos or salad.

Make it a meal with:

And luckily this one is naturally gluten free.

Sweet Pork

  • Servings: A LOT
  • Difficulty: medium
  • Print


Great for big gatherings, and it freezes well.

Ingredients

Seasoning

  •  1 Tbsp. cumin
  •  1 Tbsp. Paprika
  •  1 Tbsp. Onion Powder
  •  1 Tbsp. Chili Powder
  •  1 Tbsp. Garlic Powder
  •  2 tsp. Salt
  •  1/2 tsp. Black Pepper

Pork

  •  3-5 lbs. Pork Shoulder (or boneless sirloin pork roast, but it’s not as good)
  •  1 c. Root Beer or Cola
  •  1 c. Green Salsa (aka salsa verde. Herdez is great, but use Mild–medium is surprisingly hot)

Sauce

    •  2 c. Red Enchilada Sauce (Rosarita is good)
    •  1/2 c. Brown Sugar
    •  8 oz. Chopped Green Chiles
    •  1 c. Green Salsa

Directions

For seasoning: Combine all the seasoning ingredients together in a small bowl. Measure out 2 Tbsp. of the mixture and save for later. Cut the pork roast into large chunks (4-6 inches) and rub the remaining seasoning mixture (not the reserved 2 Tbsp.) evenly over all sides of the pork.

For pork: Add the soda and green salsa to the slow cooker. Stir to combine. Add the seasoned pork. Cover and cook on low for 8-9 hours or high for 5-6 hours until tender. Transfer the pork to a cutting board or pan and shred. Discard all but 1/2 cup of the cooking liquid in the slow cooker, then add the shredded pork back.

For sauce: To the pork in the slow cooker, add the 2 tablespoons of reserved spices and the rest of the sauce ingredients, then stir to combine. Cover and cook on high for 15-20 minutes until heated through.


Pork Ribs

Man, pork ribs are amazing when they’re so tender that they fall off the bone. This recipe is very simple but very delicious–haha, and not very specific in terms of measurements. Of course these can be a little greasy, so you may want to serve it with something light.

And luckily this one is naturally gluten free as long as the rub and BBQ sauce don’t have gluten (which most don’t have gluten anyway). Also, you may want to use a dedicated gluten free brush when you’re brushing on the sauce, since gluten can be trapped in the bristles.

Make it a meal with:

Pork Ribs

  • Servings: varies
  • Difficulty: easy-medium
  • Print


Amazing, especially when tender.

Ingredients

  • Pork Back Ribs
  • Rib Rub (like Famous Dave’s)
  • BBQ Sauce

Directions

Using a knife or spoon, pull the silver skin off the ribs. Rub a small amount of rib rub all over (not too much or it will be overwhelming), then wrap the ribs in foil and cook at 275° for 4 hours or until tender. Then remove at least the top layer of foil (carefully–there may be lots of hot juice), brush on BBQ sauce, and broil or grill for a few minutes until the sauce caramelizes.


Pizza Dough

This is from Bobby Flay’s recipe, just with a few clarifications and more info. It’s one of Food Network’s most popular recipes. You can make it with bread flour or all purpose flour. We usually opt for the all purpose flour because it’s cheaper and is still great. The longer you can give this dough to rise, the softer and fluffier it will be. I generally start making the dough 3-4 hours before we want to eat, so there will be plenty of time to rise.

It’s a fun activity for a date night, family cooking, or even holidays, especially when you toss the dough in the air. We’ve had a few times when we’ve made individual pizzas with our guests, so they can put on whatever toppings they’d like.

If you’re making this gluten free, I find that any bread-based recipe will not translate well–because gluten is so integral to the rise and structure of bread. And because gluten free dough ends up being like Play Doh or frosting after you mix it. So you’ll want to use a different recipe like this one.

Make it a meal with:

  • Of course all the pizza toppings, sauce, and cheese
  • Green Salad
  • Root Beer

Pizza Dough

  • Servings: 2 pizzas
  • Difficulty: easy-medium
  • Print


You can use bread or all-purpose flour for this great dough.

Ingredients

  • 3 1/2 c. Flour (plus more for rolling)
  • 1 tsp. Sugar
  • 1 envelope Instant Dry Yeast
  • 2 tsp. Salt
  • 1 1/2 c. Water, 110 degrees
  • 2 Tbsp. Olive Oil (plus 2 tsp. for oiling the bowl)

Directions

Fit a stand mixer with a bread hook, then combine flour, sugar, yeast, and salt in the bowl to combine. While the mixer is running on low speed, add water and 2 Tbsp. oil until dough forms into a ball. Then beat 5 minutes on medium speed to help form gluten. (If the dough is too sticky, add flour. If it’s too dry, add water.) Scrape the dough out of the bowl onto a floured surface and knead into a ball.

Grease a large bowl with the remaining oil, add the dough, and cover the bowl with plastic wrap. Place in a warm area to double in size (longer is better–I generally like at least 2 hours). Then turn out onto a floured surface and divide in half. Cover and let rest for at least 10 minutes (I generally opt for 30 minutes).

Toss or roll out the dough. (Optional: Cover a pizza peel with corn meal before placing dough on top to help the pizza slide off.) Top with sauce, cheese, and toppings as desired. Bake on a preheated pizza stone at 450° for at least 15 minutes until the crust is golden brown underneath.


Fish and Chips Batter

I think this was originally a copycat for Long John Silver’s fish and chips batter. I’m not sure if really does taste like a copycat because I think I’ve only eaten there once in my life, but it’s a great recipe. It’s flaky and crisp like a fish and chips coating should be–flakier than say a soft sweet and sour chicken breading. Although, I have used this to make sweet and sour chicken as well, and it’s still delicious.

Make sure to use a nice white fish–I generally use cod–and squeeze the extra water out of the fish before dipping so the coating will adhere nicely to the fish. Otherwise it can get gooey and come off easily after it’s cooked. Also, if you’re frying fries to go with your fish, you’ll probably want to do those before frying the fish so the oil doesn’t taste fishy for your fries or have pieces of fish stuck to the fryer basket.

If you’re making this gluten free, all you need to do is use gluten free flour. I’ve made it a few times, and it’s delicious–I can’t tell that it’s gluten free. Note that gluten free stuff often doesn’t get as dark golden brown as regular, so you may want to cook it a little more “blonde” than usual so the fish doesn’t shrink and overcook. The recipe picture is gluten free.

Make it a meal with:

Fish and Chips Batter

  • Servings: 3
  • Difficulty: medium
  • Print


Make sure to use a nice white fish and dry it before coating.

Ingredients

  • Oil for frying
  • Salt and Pepper to taste
  • 3-4 Frozen Cod filets, thawed
  • 3/4 c. Flour (or gluten free flour with xanthan gum)
  • 2 Tbsp. Cornstarch
  • 1/4 tsp. Baking Soda
  • 1/4 tsp. Baking Powder
  • 1/4 tsp. Salt
  • 3/4 c. Water

Directions

(Fry your fries before your fish so the oil doesn’t taste fishy. To thaw the cod, place it in a water bath in the wrappers for 30 minutes.) Preheat oil in deep fryer around 350. On a cutting board, place paper towels below and on top of cod filets, then gently press out as much extra water as you can. Lightly salt and pepper the fish, then cut the filets into chunks for frying (generally 4 or so per filet). In a medium bowl, whisk together the rest of the ingredients to form the batter. When the oil is heated, place the fish chunks in the batter to coat. Using tongs, drop the fish in the oil. You may want to hold onto each chunk and let it cook for a few seconds before dropping, just so the batter doesn’t cook into the basket and get stuck. Cook fish until the coating is golden brown, generally 3-5 minutes. Serve with fries and tartar sauce.