Strawberry Shortcake Ice Cream Cake

This recipe comes from Valerie Bertinelli from the Food Network. I was excited because I really missed the strawberry shortcake ice cream bars since being diagnosed with celiac disease, and I saw that I could easily make this recipe gluten free if I use the Great Value gluten free golden Oreo knockoffs (just buy two bags). Gluten free or not, this recipe is delicious. It does take a fair amount of time, but you don’t have to cook anything, and everyone loves it. I’ve even made it for a birthday cake.

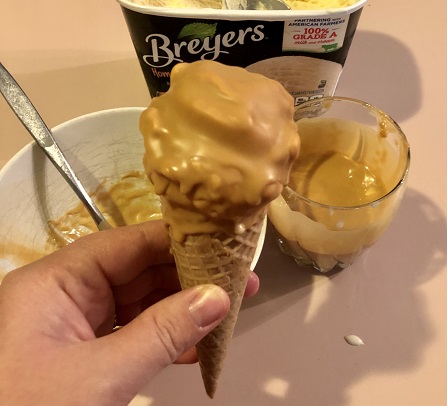
I opted for using the cheaper Kroger ice cream because the ice cream in the original bars isn’t like a high quality Breyer’s vanilla bean or strawberry. And for the cheapest freeze dried strawberries, I also get them at Walmart. I may also consider doubling the strawberry topping because it’s delicious and my topping doesn’t look as thick as the picture on the Food Network (maybe gluten free golden Oreos are smaller than regular ones).

As I mentioned, if you’re making it gluten free, just use a gluten free version of golden Oreos, such as the Great Value variety. The other ingredients should be gluten free (just check the label in case).

Strawberry Shortcake Ice Cream Cake

  • Servings: 12
  • Difficulty: easy-medium
  • Print


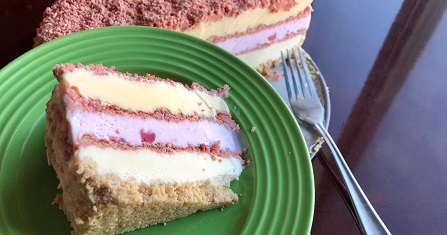
Let the ice cream cake soften on the counter for a few minutes before eating.

Ingredients

Crust:

Shortcake Crumbs (you may want to double or make 1.5):

Filling:

  • 7 c. Vanilla ice cream (buy 2 containers), slightly thawed in the fridge
  • 3 c. Strawberry ice cream, slightly thawed in the fridge

Directions

For the crust: Line the base of a 9-inch springform pan with parchment paper and lightly spray the pan with nonstick cooking spray.

To a  blender or a food processor fitted with the blade attachment, add the sandwich cookies, slightly breaking them up as you add them. Process until the cookies are completely broken up. While the machine is running, slowly stream in the melted butter. The mixture should now resemble wet sand and should hold together when pressed in your hands. Add the mixture to the prepared pan and evenly spread all over the base and about 1/2 inch up the sides. Place the crust in the freezer for 30 minutes. Reserve the blender to make the shortcake crumbs.

For the shortcake crumbs: To the blender or food processor, add the sandwich cookies, slightly breaking them up as you add them. Add the freeze-dried strawberries. Process the mixture until it’s a very fine, cohesive consistency. With the machine running, slowly stream in the melted butter, then set aside.

For the filling: When the crust is frozen, scoop on half of the softened vanilla ice cream. Use a small offset spatula to smooth the ice cream into an even layer. Sprinkle about 3/4 cup of the shortcake crumbs over the ice cream, slightly pressing in to adhere. Freeze for 45 minutes.

After 45 minutes, scoop on the softened strawberry ice cream. Use a small offset spatula to smooth the ice cream into an even layer. Sprinkle about 3/4 cup of the shortcake crumbs over the ice cream, slightly pressing to adhere. Freeze for 45 minutes.

After 45 minutes, scoop on the remaining vanilla ice cream. Smooth with an offset spatula and top with the remaining shortcake crumbs. Freeze for at least 6 hours and up to overnight.

To serve, run a knife or offset spatula around the edge of the cake to loosen it from the pan. Remove the springform ring and slice the cake into wedges. Let the wedges sit for several minutes to soften slightly for best results.


Fajitas

Fajitas are wonderful, whether made with steak or chicken. Haha, we usually opt for chicken because it’s cheaper. You don’t need a whole packet of taco seasoning–just enough to give it a little flavor. Serve with Spanish rice or cilantro lime rice, cheese, sour cream, maybe some salsa, and of course a tortilla.

If you’re making this gluten free, make sure to use gluten free taco seasoning and corn or other gluten free tortillas. You may also want to use a new or uncontaminated bag of cheese. Also, don’t use the Kroger fajita seasoning because it has gluten.

Make it a meal with:

Fajitas

  • Servings: 5?
  • Difficulty: easy-medium
  • Print

Don’t forget the Spanish rice or cilantro lime rice.

Ingredients

  • 2 Tbsp. Vegetable Oil
  • 1 Large Onion, chopped
  • 2 Green Peppers, cut in small strips
  • 1 1/2 – 2 lbs. Chicken breasts or beef sirloin, sliced thin
  • Salt and Pepper to taste
  • Taco Seasoning to taste (such as McCormick or homemade)
  • Salt and Pepper to taste
  • Spanish rice or cilantro lime rice
  • Flour or corn tortillas
  • Possible toppings: Cheese, sour cream, salsa, etc.

Directions

In a heavy pan, heat the oil then add the onion and green peppers. Cook until tender and maybe with a tiny bit of black for flavor. Salt and pepper to taste. Remove and place in a bowl. In the heavy pan, brown the chicken and then salt and pepper to taste. Add the onion and peppers back into the pan, then sprinkle all with taco seasoning. Serve on top of tortillas and rice, adding sour cream, salsa, or other toppings as desired.


Hamburger Gravy

Jeff LOVES this meal and says he could eat it every fast Sunday after 24 hours of eating nothing. Jeff’s family used to have hamburger gravy pretty often when they were growing up. And they usually used 1 lb. of beef for their 8+ member family. But we like it very beefy and Jeff loves the leftovers, so we usually do 2 lbs. of beef and use a 5 lb. bag of potatoes to make mashed potatoes. It’s also very easy if you have pot roast gravy in your freezer, which we usually do. I just microwave it for several minutes to thaw before adding it to the beef.

If you’re making it gluten free, just make sure that your gravy is gluten free. I usually make gravy from pot roast broth or beef broth and thicken it with cornstarch.

Make it a meal with:

Hamburger Gravy

  • Servings: 6?
  • Difficulty: easy
  • Print

Easy and hearty–serve with mashed potatoes and corn.

Ingredients

  • 2 lb. Ground Beef
  • Salt and Pepper to taste
  • 1-2 jars Beef Gravy (like this) or 1 container thawed homemade pot roast gravy from freezer (size can vary based on how much liquid you want–we often freeze a Cool Whip container full)
  • (Serve with mashed potatoes and corn)

Directions

In a large deep skillet, brown the beef and add salt and pepper to taste. Add gravy and warm through. Serve with mashed potatoes and corn.


Chili Lime Corn

We actually went looking for this recipe because Disneyland often has delicious-smelling corn on the cob. I can’t remember if we ever actually tried the corn at Disneyland, haha, but we found this recipe on Food Network and adapted it. Since then, we’ve made it a lot over the years.

You can top frozen corn with just the flavorings after microwaving (obviously it’s not 100% the same). And sometimes we’ll be short on time and we’ll boil the corn cobs beforehand and then grill for just a few moments–but the best flavor comes from letting the corn grill from raw. The original recipe called for grilling the ears in the husk, but we didn’t have good results with that–so we went to aluminum foil. And you generally only need one lime for this recipe if it’s large enough and juicy enough.

Sometimes the flavor is very subtle, so we’ve sometimes doubled the butter mixture for the corn. You spread it on with a spoon or pastry brush. Here’s what it looks like with a single batch:

And this one is naturally gluten free.

Make it a meal with:

Chili Lime Corn

  • Servings: 4
  • Difficulty: easy-medium
  • Print


Delicious flavors, but it usually takes longer to make than I think. Double batch for more flavor.

Ingredients

  • 4 Tbsp. Butter, at room temperature (you can melt if you’re in a hurry)
  • 1 1/2 tsp. Lime Zest

  • 1 Tbsp. Lime Juice

  • 1 tsp. Chili Powder

  • 1/4 tsp. Dried Minced Garlic

  • 1 tsp. Salt

  • 1/2 tsp. Pepper

  • 4 Ears of Corn, husked
  • (Aluminum foil for wrapping)

Directions

Preheat grill to medium. In a small bowl, combine butter, lime zest, juice, chili powder, garlic, salt, and pepper and set aside. Tear off a piece of foil for each ear of corn. Place an ear of corn on the foil, then spread butter mixture evenly on corn with a spoon or pastry brush. Wrap each ear in foil tightly, to keep juices in. Grill for 15-20 minutes, turning every 5 minutes.


Cilantro Lime Rice

I make this rice a lot as a side for taco salad, to go in fajitas, or of course to go with sweet pork burritos or salad. I usually end up getting the rice started to cook and then work on adding the rest of the ingredients–and by the time the 15 minutes of cooking is up, I finally have finished adding all the other ingredients. I think the zesting and juicing the lime takes the most time. But it’s still pretty fast and easy. And often instead of adding chicken broth, I’ll do a heaping 2 tsp. of chicken base with 2 1/4 c. water.

This recipe is adapted from melskitchencafe.com, which has lots of great recipes that you should check out–I’m just including it here for my convenience and because I don’t make any money off this blog.

And this one is naturally gluten free.

Make it a meal with:

Cilantro Lime Rice

  • Servings: 6
  • Difficulty: easy-medium
  • Print


Great with sweet pork, taco salad, and fajitas.

Ingredients

  • 1 Tbsp. Butter
  •  1 1/4 c. Rice
  •  2 1/4 c. Chicken Broth (or 2 heaping tsp. chicken base with 2 1/4 c. water)
  •  1 scant tsp. Salt
  •  1/4 tsp. Pepper
  •  Juice and Zest of 1 Large Lime
  •  2 Tbsp. Cilantro, chopped
  •  1/4 tsp. Cumin

Directions

In a pan, melt the butter and add the rice. Stir, letting the rice and butter cook for 1-2 minutes. Add remaining ingredients and bring to a boil. Reduce heat, cover and cook for 15-16 minutes. Remove from heat and let stand, covered, for 10 minutes (I’m usually in too much of a rush for this step). Fluff with fork and serve.


Pico de Gallo Salsa

If I’m going to have chips and salsa, I love to have pico. I love the fresh made salsa at Harmons and wish I had a recipe for it, but this is a pretty good recipe adapted from one on All Recipes. Just make sure you give it lots of time to sit, so it can absorb the flavors.

And this one is naturally gluten free, just like the tortilla chips you eat with it.

Make it a meal with:

Pico de Gallo

  • Servings: 8?
  • Difficulty: easy-medium
  • Print


Chopping takes a while, but it’s delicious and easy to come together.

Ingredients

  • 6 Roma Tomatoes, diced
  • 1 large Red Bell Pepper or 2 small Green Bell Peppers, diced
  • ½ White or Red Onion, minced
  • 3 Tbsp. Cilantro, chopped
  • 1 Jalapeno, seeded and minced
  • Juice of 1 lime (or 1/2 if it’s very juicy)
  • 1 tsp. Minced Garlic
  • 1 pinch Garlic Powder
  • Salt (quite a bit) and Pepper to taste

Directions

Stir all ingredients in a bowl, then cover and refrigerate at least 3 hours so flavors can meld.


Magic Shell (Any Flavor)

When I was growing up, my favorite dipped cone at Dairy Queen was butterscotch. But of course they discontinued it. And they don’t do cherry anymore either. But I’d heard that all you need to make Magic Shell is baking chips and coconut oil. And you know what? They’re right! It’s so easy! If you want to dip, just get a glass and make sure your scoops are secured well before dipping. Hurray for the return of my butterscotch dipped cones!

And luckily this one is naturally gluten free. But if you want to save it for future use, make sure everyone else only uses gluten free ice creams and cones in the dip.

Magic Shell & Dip

  • Servings: 6?
  • Difficulty: easy
  • Print


Fun and easy for summer

Ingredients

  • 1 c. Baking Chips (any flavor, like butterscotch, peanut butter, chocolate, mint chocolate, etc.)
  • 3 Tbsp. Coconut Oil (measured when solid or liquid)

Directions

Microwave the chips and oil for 30 seconds in a medium glass, then stir until smooth (microwaving 20 seconds more if needed). Allow to cool for a few minutes before topping your ice cream or dipping. For dips, scoop your ice cream and make sure it’s secure before turning upside down and dipping. Allow the excess to drip off, then flip rightside up again. Store excess at room temperature in a sealed container, then microwave and stir well before using again.


Naan (Regular or GF)

Whenever we make naan, Jeff says, “I always forget how amazing naan is. I just want to eat the whole batch!” Haha. This recipe is adapted slightly from Aarti at the Food Network, and it’s so delightfully soft and buttery. Her recipe calls for added seeds, but I find that it doesn’t need it. Also, I usually like to double the batch so I can use my whole envelope of yeast (with a little extra added)–then I just freeze the leftovers. When I’m ready to use the frozen leftovers, I just put them in a 350 degree oven for a few minutes, and they’re just as good as fresh made. Make sure to eat the naan hot for the best experience.

I’ve made these regular and gluten free, and both are amazing. If you’re making these gluten free, just make sure to use gluten free cup for cup flour with a little extra, and some extra baking powder (they included a note in the Food Network recipe, and I’m so grateful). Actually, the original recipe says to use gluten free all-purpose flour with an added 1 1/4 tsp. xanthan gum, but I only had the cup for cup. So I used that with no added xanthan gum and it was just fine. Of course like any gluten free bread dough, it ends up looking more like Play D’oh or frosting than stretchy bread dough. But that’s normal. You don’t need to roll it out with a rolling pin–I just use my hands. The edges are a little more ragged than the regular one and it’s not quite as fluffy, but it’s still amazing and soft. I still don’t think I would’ve known it was gluten free. If you eat the gluten free ones after freezing or letting them cool down, make sure you heat them up very thoroughly or the edges can be almost crunchy. But when they’re fully warm, they’re delightfully soft and chewy. Here’s a picture of the gluten free version:

Make it a meal with:

Naan

  • Servings: 6
  • Difficulty: medium
  • Print


Soft, warm, and buttery–make extra and freeze for later.

Ingredients

  • 1 tsp. Yeast

  • 3/4 c. Warm Water
  • 2 tsp. Sugar

  • 2 c. Flour (or 2 1/4 c. gluten free flour with xanthan gum)

  • 1 tsp. Salt

  • 1/8 tsp. Baking Powder (or rounded 1/8 tsp. for gluten free)

  • 3 Tbsp. Plain Yogurt

  • 2 Tbsp. Olive Oil

  • Melted butter for slathering on the finished naans

Directions

In a large glass, dissolve the yeast and 1 teaspoon sugar with 3/4 cup warm water (about 100 degrees F). Let it sit on your counter until it’s frothy, about 10 minutes.

Meanwhile, sift the flour, salt, remaining 1 teaspoon of sugar and baking powder into a large, deep bowl.

Once the yeast is frothy, add the yogurt and the olive oil into the glass, and stir to combine. Pour the yogurt mixture into the dry ingredients and gently mix the ingredients together with a fork. When the dough is about to come together, use your hands to mix. It will feel like there isn’t enough flour at first, but keep going until it transforms into a soft, slightly sticky and pliable dough. As soon as it comes together, stop kneading. Cover the dough with plastic wrap, place in a warm area, and let rise for 2 to 4 hours.

When you’re ready to roll, the dough will be extremely soft and sticky. Separate the dough into 6 equal portions and lightly roll each one in extra flour. Using a rolling pin, roll each piece of dough into a teardrop shape, narrower at the top than at the bottom. It should be 8 to 9-inches long, 4-inches wide at its widest point and about 1/4-inch thick. Once you’ve formed the general shape, you can also pick it up by one end and wiggle it; the dough’s own weight will stretch it out a little. Repeat this method with the rest of the dough. (If you’re making them gluten free, just use your hands instead of rolling.)

Heat a heavy pan over high heat, then lay the naan on the skillet. Let it cook and bubble for about 1 minute per side. It should be blistered and somewhat blackened, as is traditional. 

Remove the naan from the skillet, brush with butter, and cover with a towel to keep warm. Serve warm.


Red Lobster Biscuits

Of course there are also mixes for Red Lobster’s Cheddar Bay Biscuits, but here’s a recipe that just uses Bisquick. And since they’re like the ones from Red Lobster, these are great with seafood. Make sure to eat them when they’re hot.

I haven’t tried making this one gluten free yet, but I do have a gluten free mix that I’m looking forward to using. And there is a gluten free Bisquick mix that you could try.

Make it a meal with:

Red Lobster Biscuits

  • Servings: 12?
  • Difficulty: medium
  • Print


Buttery, garlicky, and great with seafood.

Ingredients

  • 2 c. Bisquick (or gluten free Bisquick mix)
  • 2/3 c. Milk
  • ½ c. Shredded Cheddar Cheese
  • ½ c. Butter, melted
  • ¼+ tsp. Garlic Powder

Directions

Heat oven to 450°. Mix Bisquick, milk and cheese until a soft dough forms. Drop by spoonfuls onto an ungreased cooking sheet. Bake 8-10 minutes until golden brown. Mix butter and garlic powder. Brush mixture over warm biscuits before removing from cookie sheet.


Buttercream Frosting

There are lots of buttercream frosting recipes out there. But I loved the frosting on Harmons cakes and celebration cookies. Luckily the Harmons chefs shared the recipe with me (which I’m sure has changed by now anyway), and I’ve used it many times. I’ve even used it as a base for flavored buttercreams as well.

And thank goodness this one is naturally gluten free.

Buttercream Frosting

  • Servings: 12?
  • Difficulty: easy
  • Print


Perfect for cakes or sugar cookies.

Ingredients

  • 1 lb. Butter (aka 1 box)
  • 2 lb. Powdered Sugar (aka 1 large bag)
  • 1 Tbsp. Vanilla
  • 1/4 c. Water

Directions

Beat butter well. Slowly incorporate sugar. Scrape down, then mix in vanilla. Then mix in water. (For strawberry buttercream, replace the water with 1/2 c. fresh or frozen strawberries, pureed and strained.)