Russian Tea Cookies

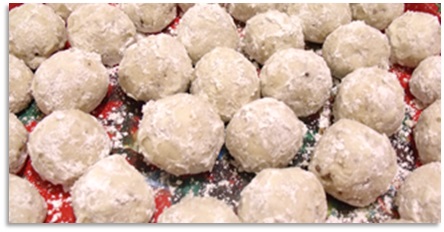
These cookies have a lot of names, but we always called them Russian Tea Cookies. And they’re traditional at our house at Christmastime. We make big batches and add them to cookie plates for our neighbors.

If you’re making this one gluten free, you’ll just want to use cup for cup flour instead of regular flour. It turns out great! Just be extra careful when rolling in powdered sugar because they fall apart more easily.

Russian Tea Cookies

  • Servings: 36
  • Difficulty: medium
  • Print


Small, popable cookies great for Christmas.

Ingredients

  • 1 c. Butter, softened
  • ½ c. Powdered Sugar
  • 1 tsp. Vanilla
  • 2 ¼ c. Flour (or gluten free flour with xanthan gum)
  • ¼ tsp. Salt
  • ¾ c. Finely Chopped Nuts (Walnuts or Pecans)
  • Powdered Sugar

Directions

In a large bowl, beat butter, powdered sugar, and vanilla together until light and fluffy. Add flour, salt, and nuts. Mix well. Roll dough into 1-inch balls and place them on an ungreased baking sheet. Bake at 350° for 10-12 minutes until set but not brown. While cookies are still warm, roll them in powdered sugar. Cool and roll in powdered sugar again. Makes 3 dozen.


Rice Krispie Treats

Haha, I suppose if you want to get eyerolls but also be technically correct, it would be Rice Krispies Treats. But who ever calls it that? In any event, I really like this version of the recipe that Jeff’s family would make, with extra marshmallows and butter. Not dry or stale at all. I remember taking these to a family event one time, and I think everyone thought, “Oh, Rice Krispie Treats. Meh. I guess I’ll take a small square.” But then after partaking of the buttery, gooey goodness, everyone ended up having large seconds or thirds. And we ate the whole pan.

If you’re making this one gluten free, make sure to use a gluten free cereal like Malt O’ Meal Crispy Rice. Don’t use Kellogg’s Rice Krispies, because they have malt flavoring, which contains gluten.

Rice Krispie Treats

  • Servings: 12?
  • Difficulty: easy
  • Print


Gooey, buttery, and better than your average Rice Krispie Treat.

Ingredients

  • 10 Tbsp. Butter
  • 2 pkgs. Marshmallows (10 oz each)
  • 12 oz. box Rice Krispies (or Malt O’ Meal Crispy Rice)

Directions

On stove, combine butter and marshmallows, heating and stirring until melted. OR for microwave, melt butter and then add marshmallows and microwave 90 seconds. Stir and add cereal immediately, mixing well. Press into greased 9×13 pan. Add mini M&Ms or chocolate chips if desired. Cool completely.


Muddy Buddies

I’ve always enjoyed Muddy Buddies, and now that I have celiac, I eat them a lot more because they’re naturally gluten free. We always seem to have Rice Chex around the house now, as well as the rest of the ingredients. I’ve even used milk chocolate chips, and it was still delicious. This recipe is straight from Chex itself, and it’s always a winner. Sometimes we’ll even put in seasonal M&Ms to add color and fun, like Valentine or Halloween M&Ms.

And of course this one is naturally gluten free. Just make sure your peanut butter jar is new or dedicated gluten free. And if you may have ever used the same measuring cup for flour as your powdered sugar, use a new bag.

Muddy Buddies

  • Servings: 8?
  • Difficulty: easy-medium
  • Print


Crunchy, chocolatey, and peanut buttery.

Ingredients

  • 9 c. Rice Chex
  • 1 c. Semisweet Chocolate Chips 
  • ½ c. Peanut Butter (new or dedicated GF jar)
  • ¼ c. Butter
  • 1 tsp. Vanilla
  • 1 ½ c. Powdered Sugar
  • (Optional: M&Ms)

Directions

Measure cereal into large bowl; set aside. Microwave chocolate chips, peanut butter, and butter in 1-quart microwavable bowl, uncovered for 1 minute; stir. Microwave 30 seconds longer or until mixture can be stirred smooth. Stir in vanilla. Pour chocolate mixture over cereal in bowl, stirring until evenly coated. Pour into gallon bag; add powdered sugar. Seal bag and shake until well coated. Add more powdered sugar if necessary.


Peanut Brittle

In the family recipes, this was labeled as “Buttery Peanut Brittle”–and it definitely is buttery. That might be what makes it better than most. I love it at Christmas and probably end up eating more than we deliver to neighbors and friends. Haha. This was also a great treat for me when I had to do the FODMAP diet.

The original recipe calls for 2 c. peanuts, but I want it insanely loaded with peanuts, so I upped it to 3 c. Also, sometimes raw peanuts are really hard to find. We have made this with unsalted roasted peanuts when we couldn’t find raw peanuts. It’s still delicious but obviously has a slightly different taste and texture.

And thankfully this one is naturally gluten free. Just check your nuts that they don’t say they may contain wheat.

Peanut Brittle

  • Servings: 8?
  • Difficulty: medium
  • Print


Crunchy, buttery, and bursting with peanuts.

Ingredients

  • 2 c. Sugar
  • 1 c. Light Corn Syrup
  • 1/2 c. Water
  • 1 c. Butter
  • 2 – 3 c. Raw Peanuts (a 16 oz. bag is about 3 c.) (check for gluten free)
  • 1 tsp. Baking Soda

Directions

Line two cookie sheets with foil and butter them, then place the pans on hot pads. In a heavy saucepan, combine sugar, corn syrup, and water. Cook and stir until sugar dissolves. When syrup boils, blend in butter. Stir frequently after the mixture reaches 230°. Add peanuts when the temperature reaches soft crack stage (around 280°) and stir constantly until the temperature reaches hard crack stage (around 305°). (You may want to use the ice water method to check for desired texture.) Remove from heat and quickly stir in soda. Mix thoroughly. Pour onto prepared cookie sheets. As candy cools, stretch it out thin by lifting and pulling from edge, using forks. Loosen from pans as soon as possible and break into pieces.


Lion House Pie Dough

The Lion House is a historic building in downtown Salt Lake City. It was originally a house belonging to Brigham Young, but now it’s a restaurant. My mom had a recipe book with several Lion House recipes, and we still use the pie dough recipe today.

If you’re making it gluten free, try a different recipe. I made this with gluten free flour, and taking it out of the oven was like taking out hot sand. Haha. Terrible. Maybe if I’d added more eggs or something. But I’d suggest just searching out a recipe formulated for gluten free.

Lion House Pie Dough

  • Servings: 2 crusts
  • Difficulty: medium
  • Print


Perfect for all your pies. Note that this uses dry milk.

Ingredients

  • ½ c. Butter (original recipe calls for 1/4 c. butter, 1/4 c. margarine)
  • 2/3 c. Shortening (original recipe calls for 1/3 c. shortening, 1/3 c. lard)
  • 1 Tbsp. Sugar
  • ½ tsp. Baking Powder
  • 1 tsp. Salt
  • 1 Tbsp. Nonfat Dry Milk
  • 3 c. Unsifted Flour
  • ½ c. Ice Water

Directions

Cream together butter and shortening. Add sugar, baking powder, salt, and milk. Add half the flour and mix well. Add water and remaining flour. On lightly floured surface, roll out dough and place in pie tin. For edges, cut off excess and pinch dough between fingers for peaks. If baking for cream pie, poke with fork several times before baking (at least 10 minutes at 400° or until golden).


English Toffee

Another candy in our Christmas triumvirate: English toffee. Haha, with the other two being caramels and peanut brittle. I’m sure most recipes call for a specific temperature, but my mom would always say to cook it until it almost smells like it’s starting to burn. But lately I’ve been doing the ice water test to make sure it’s crunchy enough. Every once in a while this toffee can get a little grainy or not as hard as I want, but it’s so delicious that we don’t really care and still eat the slightly off batches.

You can kind of use any milk chocolate that you’d like–I remember my mom taking the plain Hershey bars from the miniatures collection or the Nuggets collection that no one wanted and melting them on top of the toffee. What a great use of the boring chocolate that everyone left behind. Haha. We’ve also made this toffee with pecans and sliced almonds instead of walnuts–both were great. So pick your favorite nut and try it out.

And thank goodness this one is naturally gluten free. Just make sure your nuts don’t say that they may contain wheat.

English Toffee

  • Servings: 1 pan
  • Difficulty: medium
  • Print


Crunchy, chocolatey, and perfect for Christmas.

Ingredients

  • 1 c. Butter
  • 1 c. Sugar
  • 2 Tbsp. Water
  • 2 c. Milk Chocolate Chips
  • ½ c. Chopped Walnuts (or desired nuts) (check for gluten free)

Directions

Pour a scant layer of chopped nuts on a foil-lined baking sheet. Mix butter, sugar, and water in heavy pan. Melt and bring to boil, stirring constantly. Cook about 5 minutes or until syrup turns a darker color and begins to smell like it’s burning, generally between soft and hard crack or around 270 or so. (You may want to try the ice water test to make sure it’s your desired texture.) Pour immediately onto foil-lined pan. Sprinkle top of hot candy with chocolate chips. Let melt and spread with knife to cover. Sprinkle with chopped nuts. Let cool completely so chocolate is solidified. Lift candy slab from foil and break into pieces.


Mini Fruit Tarts

My husband gets so excited to make these tarts. We’ve made them a few times, with the youth at church and for our anniversary during the pandemic–we had a “Paris at Home” day and made fruit tarts, eclairs, and cream puffs, among other things. I love the versatility of these tarts because it’s basically pudding with anything you want on top. They look beautiful, but they’re pretty easy to make.

Just as a note, we made this with a big box of pudding–and it was far too much. So a small box is the way to go. Also, it seemed like the orange zest that we added affected the texture. You could definitely feel the zest in your mouth. But the lemon zest seemed okay, if I remember correctly.

If you’re making this one gluten free, you’ll need to make a gluten free crust, whether you use gluten free “graham” crackers or a gluten free Oreo crust.

Mini Fruit Tarts

  • Servings: 24
  • Difficulty: medium-hard
  • Print


Beautiful, versatile, and simple.

Ingredients

Crust

  • 20 Full Graham Crackers (or gluten free graham crackers)
  • 1 c. Butter
  • 1/2 c. Powdered Sugar

Filling

  • 1 small box Instant Pudding (vanilla, chocolate, or other)
  • Milk necessary to make the pudding (check the box)
  • Orange or lemon zest (optional–may affect texture)

Topping options

  • Bananas
  • Assorted Berries
  • Mandarin Oranges
  • Other fruit (if desired)
  • Chocolate (shaved or curled)
  • Whipped Cream
  • Finely Chopped Nuts

Directions

For the crust, preheat oven to 350°. Crush graham crackers in a blender. Pour powdered sugar into the blender and mix thoroughly. Pour dry ingredients into a medium bowl. Mix in butter until all dry ingredients are wet. Should be clumpy. Scoop out portions a little bigger than a tablespoon into each cup of a mini cupcake pan. Press mixture to form a shallow cup with a mini tart shaper. (You can use your fingers or something else.) Bake 5-6 minutes or until edges are bubbling. It is normal for there to be “pools of butter” inside some if not all of the cups. Remove pan from oven and let cool for at least 15 minutes.

For the filling, follow directions on box of instant pudding. Optionally, zest an entire orange or lemon (orange for chocolate flavored puddings and lemon for vanilla flavored puddings). Mix the zest with the pudding (FYI, it may affect the texture, so you may want to test a little in a spoonful before adding to the whole tart.) Once crusts have cooled, place pudding into each cup. You can either spoon in the pudding, pour it in, or use a pastry bag to pipe in the pudding. Once all cups have been filled in the pan, drop the pan from 1” onto the counter to help get rid of air bubbles. Smooth the top of the pudding with a spoon or spatula.

For topping, remove the tart cups from the pan with a spoon or knife and place on a platter before decorating. Arrange fruit and other toppings as desired.


Dump Cake

Dump cake is the go-to, easy dessert when camping (haha, besides s’mores, naturally). Of course it’s called a dump cake because you basically just dump everything into the pot and let it bake. I’ve made this in a regular pot in the oven, as well as a Dutch oven over coals. Whatever you prefer, it’s going to be delicious.

Man, I made this gluten free once and it turned out really weird and rubbery. Maybe it was just the specific cake mix I used, but it was not pleasant. Maybe I’ll try it again later with a different cake mix.

Dump Cake

  • Servings: 8?
  • Difficulty: easy
  • Print


An easy and delicious dessert, perfect for camping.

Ingredients

  • 1 Cake Mix (or gluten free cake mix)
  • 1 can Pie Filling
  • 1 can Sprite
  • ½ c. Butter, melted

Directions

Make using a conventional oven or Dutch oven. For Dutch oven, use 12”. Place foil in Dutch oven or pot if baking in conventional oven, and spray foil with cooking spray. Place pie filling in bottom, then sprinkle cake mix on top. Pour Sprite over all. For Dutch oven, cover and place 15 coals on top and 9 on bottom. Turn lid ¼ turn every 12 minutes, for 45 minutes total cooking. For conventional oven, don’t cover. Bake at 350° for 45+ minutes until golden. During the last 5 minutes, pour melted butter over top. Serve hot with whipped cream or ice cream.


Butter Sauce

Oh, man. I love this sauce so much. It’s like my family’s secret sauce for desserts. The best way to have this caramel-y sauce is to pour it warm over ice cream and chocolate cake. Be warned that it is INSANELY rich. Last time we made it, I doubled the batch, and it was enough to cover about 6 pieces of cake from a 9×13 pan cut into 12 pieces. So if you want enough butter sauce for an entire cake, you’ll want to quadruple the recipe.

If you’re making this gluten free, the recipe itself is naturally gluten free. Just make sure to serve it over gluten free cake.

Butter Sauce

  • Servings: about 3
  • Difficulty: easy-medium
  • Print


Insanely rich and amazing on ice cream and cake.

Ingredients

  • ½ c. Butter
  • ½ c. Evaporated Milk or cream
  • 1 c. Sugar
  • 1 tsp. Vanilla

Directions

Melt butter, remove, and add rest of ingredients. Cook 5 minutes (low heat). Do not overcook. Pour hot over chocolate cake for a delicious dessert.


No Bake Cookies

I love these cookies when I want something fast that doesn’t require the oven. Plus, who doesn’t love chocolate and peanut butter? This recipe came from Jeff’s mom, and originally from a church cookbook in the ’60s. Haha, you know that recipes are great when they’re still used after many decades.

If you’re making this gluten free, make sure to use the special gluten free oats. Regular oats are often grown and harvested alongside gluten-containing grains–so you get a some gluten in regular oats because they can’t separate the tiny grains from each other very well. Also make sure your jar of peanut butter is new or dedicated gluten free. Additionally, I’ve made this dairy free using almond milk, and I’m not sure I noticed any difference.

No Bake Cookies

  • Servings: 24-36, depending on size
  • Difficulty: easy-medium
  • Print


Fast, delicious, and no oven needed.

Ingredients

  • 2 c. Sugar
  • 1/2 c. Butter
  • 2 tsp. Cocoa Powder (for extra chocolatey, use 2 Tbsp.)
  • 1/2 c. Milk (or almond milk for dairy free)
  • 1/2 c. Peanut Butter (new or dedicated GF jar)
  • 3 c. Oats (or gluten free oats)

Directions

In a saucepan, mix together sugar, butter, cocoa powder, and milk, and bring to a boil. Boil for 1 minute, stirring frequently so it doesn’t burn. Remove from heat and add peanut butter and oats. Mix well, then drop from spoon onto waxed paper and let set.