We used to make these all the time when we’d go camping as kids. I always forget how good these are–maybe it’s the butter that makes them so delicious. You can make these on the camp fire or in the oven. We’ll often make a “camping” family night at home and have tin foil dinners, then roast some marshmallows.
I remember one time when I was about eight, my dad was in charge of Scouts for our church, and they were going to a campout at Bear Lake. My mom, twin brother, and I decided to tag along with Dad and my older brother as they went camping with all the other boys from the church. The first night was a Sunday, and all the boys were supposed to bring their own dinner with them. Most boys did, but two or three forgot. So we had to give up our tin foil dinners to those boys, and mom had to find somewhere for the three of us to get dinner. That was the first time I ever ate a raw onion on a diner burger. It was hot! Haha. But I’ll never forget it. And I think raw onions are fine now. Just a funny memory.
And of course these are naturally gluten free–I even had these when I had to do the FODMAP diet for a few months.
Make it a meal with:
- S’mores, Roasted Marshmallows, or Rice Krispie Treats
- Grapes
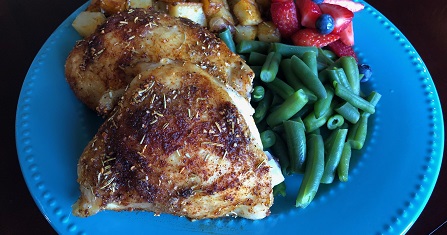
Tin Foil Dinner
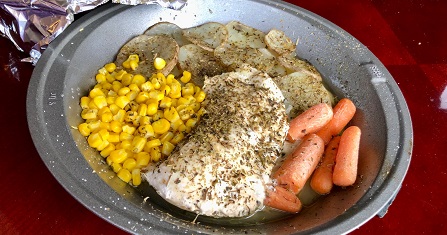
Ingredients
For each person’s pie tin, you’ll need:
- 1 pie tin or round cake pan
- 1 Chicken Breast
- 1 medium Potato, peeled (optional) and sliced
- Corn
- Italian Seasoning
- 2 Tbsp. Butter
- Baby Carrots (optional)
- Tin foil
Directions
In a pie tin, place chicken, potatoes, and corn. (You may want to place carrots in the bottom/top if you’re cooking on the fire, in case of burning.) Place 1 Tbsp. of butter on the potatoes and 1 on the corn. Sprinkle all with Italian seasoning. Cover well with foil. In the oven, cook at 375° for 30-45 minutes, depending on thickness of chicken. If cooking on the fire, stack dinners with 6 coals on bottom and on top. Check after 20-30 minutes. Cook until the carrots are tender and the chicken reaches an internal temperature of 165°.
For a sheet pan dinner for a family: Place the carrots on a sprayed sheet pan in a preheated oven while you slice the potatoes. Carrots need to cook longer. Once you’re done slicing, place the potatoes on a layer, season and cover with butter, then place chicken breasts on top and season those. Cover all with foil and bake as directed.