Green Beans & Bacon

We have this every year at Thanksgiving. The house is already full of delicious smells of turkey and hot rolls, then you add the beauty of bacon, and it’s glorious.

There are two ways you can make these beans. The first way is to do everything in the microwave–just put everything in a microwave-safe container with a lid and microwave for 20 minutes. The bacon does turn out floppy this way. We always used to use fresh green beans and then use the microwave method, either frying the bacon beforehand and then microwaving with beans or just putting the bacon in uncooked.

But lately we’ve been doing the stovetop method with frozen green beans. If you’re running low on time or want crispy bacon, you can cook the bacon in a pan on the stove until crispy, then add everything else and heat through. Either way is delicious. It can tend to be greasy, though.

And good news, this one is naturally gluten free.

Make it a meal with:

Green Beans & Bacon

  • Servings: 8?
  • Difficulty: easy
  • Print


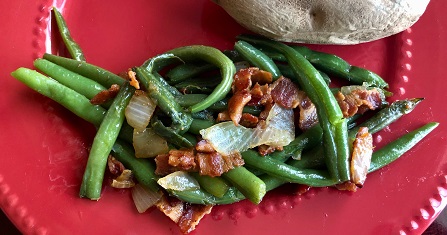
Haha, a deliciously unhealthy take on a healthy vegetable.

Ingredients

  • 6 c. fresh Green Beans (about) or 2 pkgs. frozen Green Beans
  • ¼ c. Water
  • 1 pkg. Bacon
  • 1 Onion, chopped
  • Salt and Pepper to taste

Directions

For microwave method, wash and trim full-length fresh green beans and place in microwave dish with lid, pouring water in bottom. Cut bacon with scissors and fry on the stove, then pour bacon and onion over beans in microwave-safe dish (or cut up uncooked bacon and place on top of beans with onions); but don’t mix because of water in bottom. Microwave about 20 minutes or until done.

For stovetop method, cut up bacon and fry on the stovetop, drain a little grease, then add onion and green beans to pan (omit water), and cook until it reaches the desired tenderness. You may want to put on a lid and let it steam for a few minutes. Season with salt and pepper to taste.


Broccoli Apple Bacon Salad

Even if you’re not a fan of raw broccoli, the bacon and onion add a wonderful flavor to this fresh salad. It’s a great departure from plain iceberg salad in a bag. We don’t make it much anymore, but it’s still delicious.

And luckily Brianna’s Poppy Seed Dressing is gluten free, so this whole salad is naturally gluten free.

Make it a meal with:

Broccoli Apple Bacon Salad

  • Servings: 6?
  • Difficulty: easy
  • Print


A great bacony departure from regular iceberg salad.

Ingredients

  • 1 bag fresh Broccoli
  • 8 Bacon Strips, cooked and chopped
  • 1 Apple
  • ½ Onion
  • ½ c. Pecans
  • ¼ c. Craisins (optional)
  • ½ bottle Kroger or Brianna’s Poppy Seed Dressing

Directions

Cook and chop bacon. Then combine all ingredients and toss.


Bavarian Potato Salad

I know people hear “German potato salad” and they think of a weird hot salad. But at least on my mission in Southern Germany and Austria, I had a LOT of potato salad and never had it served hot. Mostly it was beautiful golden potatoes, delightfully oniony, and in a vinegary broth.

This recipe is adapted from one in a Bavarian cookbook that I bought in Germany. Haha, German cookbooks sometimes aren’t very specific, just saying things like “oil” and “some vinegar”, so I tried to figure out a little more specific quantities for an authentic taste. You may end up with a fair amount of liquid in it. We don’t make it very often because my family doesn’t like vinegar, but it’s good if you’re looking for a more authentic recipe.

And this one is naturally gluten free.

Make it a meal with:

Bavarian Potato Salad

  • Servings: 10?
  • Difficulty: medium
  • Print


Oniony, vinegary, and full of Bavarian flavors. It does take a bit of time, with cooking, peeling, and cutting potatoes.

Ingredients

  • 3 lb. bag Yukon Gold potatoes
  • 1 c. Vegetable Broth
  • Salt and Pepper to taste (you’ll need quite a bit of salt)
  • ½ c. Vegetable Oil
  • 1 ½ c. White Vinegar
  • 1 small White Onion
  • 2 heaping Tbsp. chopped fresh Parsley

Directions

Steam potatoes (about 15-20 min.), then peel and slice, cutting slices in quarters. Warm the vegetable broth, then add salt, pepper, oil, vinegar, onion, and parsley. Pour over potatoes. Mix well and let it absorb for at least half an hour. Adjust flavors as needed.


Bottled Fruit

I have fond memories of using the cherry pitter to punch out the pits from dozens of cherries, and the house filled with the smell of bubbling tomatoes in the fall. The smell of cooking tomatoes is still one of my favorite smells in the world and reminds me delightfully of childhood. And the first time I ever bottled anything on my own (pears from the tree in Provo), I felt like a real accomplished pioneer, haha. Just make sure to save your bottles and buy new lids every year because the lids can only be used once.

*Make sure to look up cook times for your specific altitude and canner, in order to cook properly and prevent botulism. The times I provide are for my specific canner and altitude.

And of course these are all naturally gluten free.

Bottled Fruit

  • Servings: 1qt
  • Difficulty: medium
  • Print

For food safety, please check your canner’s specific cook times.

Ingredients

For each 1 qt. bottle, you’ll need:

  • Fruit of Choice
  • ½ c. Sugar
  • 1 Vitamin C Tablet (500 mg)
  • ½ c. Boiling Water
  • (More Boiling Water to fill)

Fruit Cocktail:

  • 18 c. Pears (about 20 pears)
  • 24 c. Peaches (about 30 peaches)
  • 8-10 c. Green Grapes
  • 12 c. Pineapple Tidbits (one large can)
  • 7 stemless Maraschino Cherries cut in half (per bottle)

Directions

Make syrup in bottom of bottles by combining sugar, tablet, and ½ c. boiling water. Swirl till sugar is dissolved. Add fruit. Add extra boiling water till ½” from top of bottle. Slide knife down the side to make sure any bubbles come to top. Wipe top of bottle. Put on lid and cap, and tighten. Steam can according to table of instructions with steam canner (can also look up online).

Fruit Cocktail

Mix all but cherries in a large bowl. Fill in layers and place cherries on top. Makes several quarts.

Tomato Sauce

Remove leaves and cores, then liquefy tomatoes in blender. Pour into large pot and boil until volume reduces to half. Then fill bottles to ½” below top and seal as usual.

Steamer instructions: Put 6 c. water in bottom of pan, put on grill/grate and turn on high. Place bottles on grate, making sure bottles don’t touch. Cover with dome lid. Wait for steam to come out of hole in steady stream of 8”. Start timing at this point. If it gets too strong, turn down. (At my altitude, pears=30 min., cherries=20 min.) When time is done, turn off and tip lid with steam going toward back and pull off quickly so as not to hit your face with steam. Remove bottles with bottle lifter to towel-covered surface and allow to sit overnight. Check for seal by tapping top. If not sealed, put in fridge and use right away. Most lids will pop as you lift dome off or soon after, even up to an hour later. (For pint bottles, use half recipe and check chart for time.)


Baked Apples

The perfect accompaniment to any cold-weather dinner, either as a side dish or a dessert.

And this one is naturally gluten free!

Make it a meal with:

Baked Apples

  • Servings: 4
  • Difficulty: easy
  • Print


Cook time may vary based on the size of the apple.

Ingredients

  • 4 large baking Apples
  • ¼ c. Brown Sugar
  • 1 tsp. Cinnamon
  • ½ c. chopped Pecans
  • 1 Tbsp. Butter
  • ¾ c. boiling Water

Directions

Preheat to 375°. Core apples and make hole 2” wide. You want a nice big hole so you can fit as much filling as possible. In small bowl, combine brown sugar, cinnamon, and pecans. Place apples in 8×8 pan and stuff with mixture. Cut the butter in quarters and place a piece of butter on top of each apple. Add boiling water to pan, bake 30-40 minutes. Test doneness with a knife. When apples are done, spoon the hot juices over the apples.


Harry Potter Butter Beer

We’ve had this as part of a Harry Potter Halloween party a few times, including dragon steaks, gnomes (aka baked potatoes with smiley faces because gnomes are described as looking like muddy little potatoes), and venomous tentaculars (green beans). This is adapted from a news site’s butter beer recipe that they posted after Harry Potter land opened. FYI, it is easy to add too much cream to the top of your drink. It’s delicious, but also very rich.

And like most drinks, this one is also naturally gluten free.

Harry Potter Butter Beer

  • Servings: 4
  • Difficulty: medium
  • Print


It takes a little work and you have to let the caramel cool, but it makes a fun drink and the cream is delicious.

Ingredients

  • 1 c. Brown Sugar
  • 2 Tbsp. Water
  • 6 Tbsp. Butter
  • ½ tsp. Salt
  • ½ tsp. Apple Cider Vinegar
  • ¾ c. Heavy Cream, divided
  • ½ tsp. Rum Extract (optional–maybe even better without)
  • 6 c. Cream Soda (about 1 ½ liters or 4 cans)

Directions

Gently boil brown sugar and water, stirring often, until candy thermometer reads 240° (230° for high altitude). Stir in butter, salt, vinegar, 1/4 c. cream. Cool to room temp, then stir in rum extract.

Topping: Combine 2 Tbsp. of the mixture and remaining ½ c. cream. Use mixer to beat until just thickened, about 2-3 minutes. To serve, divide brown mixture between 4 tall glasses (about 1/4 c. per glass). Add 1/4 c. soda to each glass, then stir to combine. Fill glass nearly to top with additional soda, then spoon whipped topping over each.


Homemade Root Beer

One of the best parts of homemade root beer is the root beer slush that forms after an hour or two of bubbling. It’s not the Fourth of July without it! And it’s also really fun at Halloween for a witch’s brew.

*Note: They stopped making McCormick Root Beer Concentrate in 2020. No! We’ve tried several other kinds of concentrate. Some are okay, some are gross. We know Hires and Watkin’s are not good. We did try Torani root beer syrup and added some extra sugar and vanilla, and it was pretty good, albeit a bit expensive. We tried Zatarain’s concentrate, and it was okay but not great. We may just end up buying two-liters in the future. 😦

And like most drinks, this one is also naturally gluten free.

Homemade Root Beer

  • Servings: 5gallons
  • Difficulty: easy
  • Print

Perfect for the 4th of July or witch’s brew on Halloween.

Ingredients

  • 1 bottle McCormick Root Beer Concentrate
  • 5 lb. Sugar
  • 6 – 7 lb. Dry Ice
  • 5 gallons Water (a little less)

Directions

In an Igloo dispenser, stir sugar, some water, and concentrate until sugar is dissolved. Then add ice (being careful not to let it touch your bare hands) and remaining water. Cover loosely with lid and stir occasionally. Ready in 1 hour.


Orange Juliuses

It was always exciting when Mom would ask if we wanted to make Orange Juliuses, like those fancy drinks in the mall food court that were too expensive for us. Haha, so I’m not sure if these actually taste like Orange Juliuses, but they’re at least a nice orange treat.

And like most drinks, this one is also naturally gluten free.

Orange Juliuses

  • Servings: 2?
  • Difficulty: easy
  • Print

A cold, creamy orange drink that doesn’t require ice cream.

Ingredients

  • 3/4 c. frozen Orange Juice Concentrate
  • 3/4 c. Milk
  • 3/4 c. Water
  • 1/4+ c. Sugar
  • ½ tsp. (at least) Vanilla
  • 20 Ice Cubes or until thick

Directions

Mix in blender until drink is desired thickness and ice is all crushed.


German Adventspunsch

I was introduced to a variation of this on my mission, at a ward Christmas party in Vienna. But it’s in both Germany and Austria. Then I bought Winterzeit tea and brought it back to America to make this at home. We made it every Christmas morning for a few years after my mission while the tea bags lasted, enjoying drinking out of fancy tea cups and a tea pot I bought at a second hand shop in Bayreuth, and eating Lebkuchen or Stollen with it.

And like most drinks, this one is also naturally gluten free.

German Adventspunsch

  • Servings: 8?
  • Difficulty: easy
  • Print


A nice, hot punch with the flavors of Christmas.

Ingredients

  • 1 bottle Cherry Juice (or a juice with cherry in its title)
  • 2 Cinnamon Sticks
  • 2 Cloves
  • 1 Lemon (Juice and Peel)
  • 1 Orange (Juice and Peel)
  • 3 Bags Christmas/Wintertime Tea

Directions

Place cherry juice, cinnamon sticks, and cloves in pot on medium heat. Cut peel from lemon and orange into pot (avoid white part or punch will be bitter). Squeeze juice from lemon and orange into the pot. When juice is boiling, place tea bags (tied together) in juice, making sure that strings hang over side of pot. Boil on medium for about 10 minutes. Then remove bags and squeeze out the liquid into punch. Pour punch through strainer into pitcher (to catch cloves, etc.) and serve hot.


Bear Lake Raspberry Shakes

This was adapted from a cookbook, and you don’t necessarily need to stir in the last ice cream and fresh raspberries at the end. It just ensures thick shakes and big pieces of fruit.

And if you’re making it gluten free, it’s naturally gluten free, as long as the ice cream is from a new container or hasn’t been scooped previously with the same scoop as a gluten-filled ice cream.

Bear Lake Raspberry Shakes

  • Servings: 2
  • Difficulty: easy
  • Print


Swap out the raspberries to make other great shakes.

Ingredients

  • 3 c. Vanilla Ice Cream, divided
  • ½ c. Milk
  • ¾ c. Fresh Raspberries, divided

Directions

Place 2 c. vanilla ice cream in blender. Add milk and ½ c. raspberries. Blend well. Pour into bowl. Add remaining 1 c. ice cream. Stir in by hand. Gently stir in remaining raspberries. Pour into tall ice cream glass. Makes 2 servings.